This time, we’re going to talk about How Often Do You Seal Grout In Shower. There is a lot of information about Do I Need To Seal Grout In Shower on the internet, of course. Social media are getting better and better quickly, which makes it easier for us to learn new things.
how often should you reseal grout in shower and What Happens If You Seal Grout Too Soon are also linked to information about How Often Do You Have to Seal Natural Stone Tile?. As for other things that need to be looked up, they are about how often should you seal shower tile grout and have something to do with Do I Need To Seal Grout In Shower.
100 Tips for How Often Do You Seal Grout In Shower | How Often Do You Have to Seal Natural Stone Tile?
- Apply grouting sealer at least once a year. Many grout sealers claim to last a year, but harsh cleaning agents will erode the sealer. High-traffic areas are also an issue and can cause sealer to deteriorate. Between sealing, remember to keep your grouted areas clean. Grout sealing helps maintain consistent colors for grout lines. - Source: Internet
- One of the stronger water-based grout sealers, this works great on both tile and grout. It’s cheap and doesn’t not have a powerful vapor fume odor. Plus, it’s easy to remove. - Source: Internet
- Grout sealer plugs tiny pores, repels future stains, and make regular cleaning easier. The life span of sealer depends on its location and the quality of sealer. Remember: grout must be cured before applying grout sealer. - Source: Internet
- Then you’ll just want to repeat this whole sealing thing every six months to a year if you can, just to head off nasty discolored or mildewed grout before it gets a chance to rear its ugly head. It’s just a smidge of maintenance to keep your bathroom looking mint, so we definitely think it’s worth the effort. We’re thinking every year from here on out will work just fine for us. What about you guys? Are you overdue for a grout sealing adventure? Has anyone already sealed theirs and noticed the easier maintenance perk that we’ve mentioned? Dish the grout sealing dirt. - Source: Internet
- If you have tile in your home, then you know that keeping the grout clean can be a challenge. Grout is a porous material that can easily absorb dirt, dust, and other debris. Over time, this can cause the grout to become stained and discolored. Aqua-X Grout Sealer is a product that can help to protect your grout and keep it looking like new. - Source: Internet
- So far our initial sealing efforts have definitely paid off. I can proudly admit that I’ve had to scrub the shower grout exactly zero times since we initially sealed everything over five months ago (and I haven’t had to touch the floor grout either). Thanks to that nice impenetrable seal it looks like we actually accomplished the lower maintenance bathroom that we dreamed of- and we didn’t even have to give up white subway tile or the coordinating white grout to do it. Whew. - Source: Internet
- A number of tile installations do not need grout sealing. Tile applied with epoxy-based grout does not need sealing. Any kind of tile that is purely decorative like wall medallions or dry tile wall wainscot can go without sealing. - Source: Internet
- As mentioned above, there are a few different methods when applying grout sealer. There are many different brands and types of sealers, though. Depending on your tile will decide what type of sealer you use. The sealer is specifically labeled for what it is to be used for. - Source: Internet
- In my experience, the best method for cleaning grout is to wet the surface of dingy lines with a mixture of hot water and mild dish soap and let it sit for about 10 minutes. Then brush the grout lines with a toothbrush and rinse off the soapy water. This can be a time-consuming or tough job if you are doing a large floor of tiles or tall walls in a shower or bathroom. - Source: Internet
- We made this mistake with the grout in our laundry room and we definitely regret it. What used to be a light gray grout with a concrete-look tile now looks like black grout and is very difficult to clean. We didn’t make the same mistake on our bathroom! - Source: Internet
- Many people make the mistake of initially sealing their grout and then never thinking about it again. Unfortunately, grout and tile does require on-going maintenance. Depending on the use your grout gets and the cleaners you use, you’ll need to apply your grout every six months to a year. - Source: Internet
- Then you should decide how you want to apply your sealant. Some people like to just seal their grout with a grout sealant applicator brush (which is sort of like a wire-y nail polish brush that can be traced along a grout line to distribute sealer along that groove. We prefer to rely on the sponge because we have very thin grout lines so we like that it feels a bit more thorough than just tracing each grout line once with an applicator brush- plus it has the added benefit of sealing our tiles while we’re at it (which can also be sealed to keep them more stain resistant and to protect them from moisture penetration as well). In other words by applying our sealant with a sponge we’re sealing entire sections of the bathroom, like the entire tub and shower surround and the entire floor. This is nice because natural stone like marble and granite can be very porous and therefore a lot more prone to staining or damage if they’re left unprotected. - Source: Internet
- Some sealers will leave a dull, hazy film over the surface of the tile. While applying a sealant to the grout, if you happen to get some on the tile, simply wet the area. Then use a dry paper towel to buff the sealant off the tile. - Source: Internet
- It is recommended that you reseal the grout in your home at least once a year but you may wait longer depending on how much wear the grout receives. If the grout is in a shower that is rarely used, it can often wait. However, in a high-trafficked area like a kitchen floor, it will need to be resealed on a frequent basis. Speak to a local grout specialist to help you determine the right frequency and how often you should reapply sealant to your grout. - Source: Internet
- Vitrified rated tiles or impervious tiles absorb less moisture. Both tiles are suited for wet and damp areas. Unglazed tiles are an option, but you’ll need to seal them with two coats of tile sealant. - Source: Internet
- But back to sealing the deal grout. The first step is to clear the room. That means everything on the floor or the shower walls (or your kitchen backsplash) must be removed so you can seal without worrying about getting it on the shower curtain, the floor mat, or the blender. We even removed our shower caddy to be sure there was not a centimeter of grout that was left inaccessible. So after we tossed a nice little pile of bathroom stuff in the nursery we were well on our way to step two. - Source: Internet
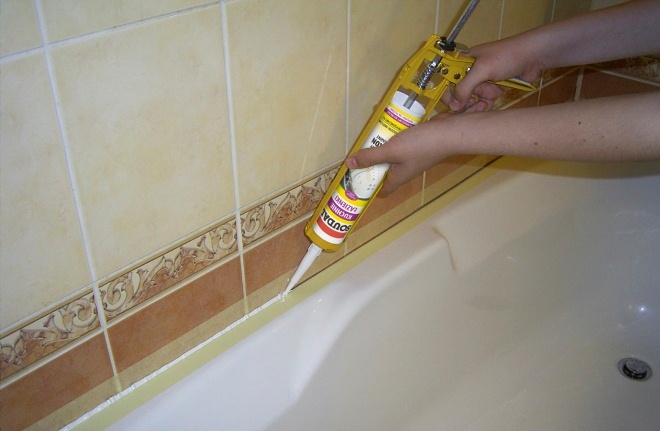
- Silicone caulking is a popular grout alternative. It’s applied to bathroom tile corners and edges. Because grout absorbs water, you need to be extra careful with bathroom surfaces. - Source: Internet
- How to choose the best grout sealer on the market. You want to have a sealer to be effective, long-lasting, easy to apply, and versatile. It should protect and seals not just grout but also most types of tile and stone to keep your shower and surrounds looking their best. - Source: Internet
- There’s also a roller bottle that works very similarly to the brush bottle. I found this method to be far less precise than both the bottle brush and foam brushes, and quite messy. But still some like this method for larger grout jobs because you can quickly roll the sealant on. - Source: Internet
- Put the grout sealant to the test. Using your finger, squirt a few drops of water onto the grout line. When the water puddles on top of the grout, you know it’s been sealed properly. This is something I’d like to attempt in a couple places. - Source: Internet
- Working with a grout sealer will enhance your DIY home repair skills. It also comes in different colors, allowing room for creativity. You can use the mixture to create contrasting colors for visual appeal. If you want to paint grout, special grout paint is available. - Source: Internet
- Seal the grout lines with the sealer. A foam paintbrush, a small roller, or a paint pad can all be used. Begin in one corner and work your way around the room, completely covering the grout joints. It’s ideal to work in the far corner of the room so you can walk out. - Source: Internet
- As demonstrated in this video tutorial, applying grout sealer is easy. You’ll need to consider the size of your tile. With larger tile pieces, you can expect faster finish times. Smaller tiles require more effort and take longer to dry. - Source: Internet
- The second step is to ensure that the grout (and surrounding tile) that you’re about to seal is clean and dust free. Since our grout was most definitely not stained, cracked, discolored, or mildewed we just ran a microfiber cloth over the surface of the shower walls to grab any spare dust particles that we didn’t want to seal into our sparkly white grout lines. And as for the floor, we did some sweeping to be sure that we picked up every last spec of dust and hair so that surface was also good to go. Again, if your grout is not in stellar condition, this would be the time to clean the heck out of it (note: be sure to read the back of your sealant instructions to see how long the grout must be dry before it’s sealed- aka: don’t scrub your tile and then try to seal it while it’s still soaking wet). - Source: Internet
- Another reason it’s smart to work in smaller sections is because five to ten minutes after you’ve begun to apply your sealant, you’ll have to start wiping it off. Of course we recommend following the specific directions on the sealer that you purchase, but both of ours had a time limit within that range that they recommended as the wait time before wiping. This meant that I could seal one out of the three shower walls (which took about seven minutes) and before I moved onto the second wall I used a dry rag to wipe down that first wall since any excess sealer should be removed within that 5-10 minute range. Then I moved on to the middle wall, which I sealed and then wiped down after around seven, and finally got to my third wall which I also sealed and then wiped down within about seven more minutes. - Source: Internet
- The chemicals in grout sealer are heavy duty. It’s best to make sure pets and children aren’t around when you apply the sealer. It’s a good idea to wear protective eye gear, a mask and gloves. - Source: Internet
- If you think that your grout requires a more substantial cleaning, try an oxygen-based bleach. Oxygen bleach usually comes in powdered form and is good for stubborn stains while serving as a general disinfectant. Plus, it is a more gentle cleaning option than liquid chloride solutions. - Source: Internet
- 2 | Grout sealers will break down over time. You will need to reseal floor grout every three to five years and shower grout once a year. Again, always clean grout carefully before resealing. - Source: Internet
- When applying, make sure to saturate the grout line while trying your best to stay away from the tile. Work on small areas at a time using a clean, dry towel to wipe tile off as needed. The sealer typically takes around ten minutes to dry. Remove any standing sealant from the grout lines with a clean, dry paper towel. - Source: Internet
- It isn’t necessary to seal tiles. Ceramic tile surfaces do not require sealing as glazed tiles have built-in stain protection. Non-glazed tile and natural stone require grout sealer as they’re porous and stain easily. - Source: Internet
- Apply a second coat of sealant to the surface. Note that some kinds require extra time between coats (or before wiping the tiles), so check the manufacturer’s directions carefully. - Source: Internet
- And when it came to our precious dark marble floor with mocha grout lines, we purchased this specialty sealer from The Tile Shop since it not only said that it works on all surfaces but was specifically formulated for marble (we felt it was safer than relying on something that lists a wide range of materials, only one of which is marble). It was pretty pricey at around $50 (although the special marble sealer at Home Depot was around $40 so it’s not usually cheap stuff anyway), but the box not only included the sealer- it also had a sponge, a grout brush applicator (for anyone with thicker grout lines), and a special cleaner formulated just for marble tiles that keeps them sparkling between annual sealing adventures. Plus we had more than enough for the initial sealing job back in January and still have tons left for touch-ups to keep things nice and protected throughout the years. - Source: Internet
- If you apply it correctly and clean up well, then no, it will not change the look of your tile at all. Some types do have color to them to change the look of the grout. Those should be cleaned up well to make sure they don’t stain your tile. - Source: Internet
- After grout sealer is applied, wipe away any excess. You don’t have to wait to start the clean-up process when using a spray sealant. After one hour, test it with water drops to see if it’s sealed. If it isn’t sealed, apply more sealer. - Source: Internet
- To prevent common grout issues such as stains, debris buildup, and soap scum residue, consider sealing the shower grout. Sealing your grout will reduce minerals, mold, and grime buildup, and lessen your cleaning load. You should aim to do this once or twice a year. Give the shower at least 24 hours to dry after cleaning it, and then contact a grout repair service in your area. - Source: Internet
- Applying a grout sealer is a critical step in the tile installation process. One problem which often arises is homeowners will forget to add grout sealer to a tile surface after it cures. The mixture is used to protect grout surfaces from dirt, grime, and stains. - Source: Internet
- Grout sealer is a clear liquid that comes in a bottle or can. The sealer is applied with a small sponge brush or sponge tip applicator. Here, we’ll show you how to use grout sealer and what to look for when you buy it. - Source: Internet
- Sealing your grout is not a lot of work. The protection it gives makes it even more worth it. If you use an epoxy-based grout that naturally repels water in your shower, you will not need a sealer. For many who will use the more traditional grout, which contains sand, sealant is needed. That sealer absorbs liquid far too easy not to be sealed. - Source: Internet
- Grout is porous which means it absorbs water. Before grout can repel water, it must be sealed. You will need to get in the habit of applying grout sealer once a year. Cement base and pores absorb grime or stains that may linger when they are not sealed. Plus, unsealed grout is easily damaged during during extended periods. - Source: Internet
- 3 | Buy the right applicator for the sealing job. A brush-tipped applicator is ideal for sealing the vertical joint lines found in showers and bathtub areas. A roller type applicator works best on tile floors or horizontal surfaces like countertops. - Source: Internet
- As long as the rubber float maintains its light pressure, the grout will remain in the seams. The rubber float continues to scrape grout off of the tile face, picking up the vast majority of the excess. The final, small amount of excess stays on the tile face in the form of grout haze: a layer of minerals so fine that only a special grout haze cleaner can pick it up. - Source: Internet
- Because cement-based grout is porous, those pores allow water to percolate inside, much like rainwater seeping into outdoor concrete. By applying sealer, you are, in effect, beating the water to the punch. You are flooding, permeating, and completely occupying the porous grout structure with a stable, hard, and non-porous substance long before the water can move in. - Source: Internet
- Once you have your grout nice and clean and dust free, the next step is to whip out your sealant of choice. There are tons of sealants that you can choose from at your local home improvement store, so just read the bottle to see what materials it’s meant for (some will specifically say “for use on marble or granite tile” or “specially formulated for dark tile” so it’s nice to find one that works best with your surface- and you can always ask the experts in the tile area if they have any recommendations if you find yourself standing there scratching your head over all the options). We opted to use this sealer from Home Depot for the white subway tiled walls of our shower/tub since the description sounded perfect for the job: - Source: Internet
- Reviews of spray-on grout sealant are mixed. Some homeowners say that this spray-on sealant does not percolate into the grout as well as the brush-on sealers. Also, there are some reports of this sealant damaging the tile caulking. - Source: Internet
- Using a coarse scrub pad and a bucket of clean water, remove all the loose grout and debris. Wipe the debris and water with a clean towel (you do not want it going down the drain.) - Source: Internet
- While you can apply the grout sealant yourself, it is not recommended. You want to hire professionals to ensure the job is done correctly. When it is not, you run the chance of moisture and bacteria finding their way into the grout, damaging it, and causing even more costly repairs. Additionally, before you apply a new layer of grout, it is recommended to deep-clean the existing grout. Expert grout cleaning services use the right equipment and supplies to clean and sanitize your grout and get it looking like new before applying a fresh layer of sealant. - Source: Internet
- When working with grout sealers, safety is a priority. Grout sealers contain hazardous chemicals like propane, polymers, butyl acetate, and hydrocarbons. To safeguard against harmful vapor exposure, the space you’re working in needs proper ventilation. You want to protect yourself from sealant vapors accumulating in your space which can lead to severe lung damage. - Source: Internet
- Because they are porous, natural stone tiles should be sealed with a penetrating sealer. Penetrating sealers, like Miracle Plus 511 Porous Plus, penetrate tiles to repel moisture from within, and prevent staining while still allowing vapors to escape. The best part about penetrating sealers is that they will protect your tile, without changing its appearance. - Source: Internet
- Then you just leave everything undisturbed for the amount of time that it says on the bottle. Our shower sealant said it needed 48 hours to fully cure before it could get wet (so we strategically applied it on a Friday night when we knew we’d be out of town for the weekend so it wouldn’t cut into our showering time). By contrast our floor sealant only needed 24 hours to fully dry (but could be walked on in just two hours) so be sure to read those labels to see what yours calls for. Either way it should only be a day or two at the most that your room is out of commission, and that’s a small price to pay for months or a full year free of grout scrubbing and mildew battles. - Source: Internet
- 6 | Let the sealer dry for at least three hours before walking on a tile floor or using any of the tile surfaces that were sealed. Let the tiles dry completely before using the shower area. This drying process can take a day or two. - Source: Internet
- To seal your grout, you will want to purchase a clear grout sealer from your local hardware store. You can find these products in the same area as the tile and grout. We used this one from Home Depot. - Source: Internet
- – This type of sealer has a milky appearance and is applied directly to the grout with a small brush tip, though many do not choose this method. Roller – When using a roller application, the roller moves down the grout line without missing any spots and very rarely needs any touch-ups. This is by far the easiest method out there. No, it won’t always be perfect, but with the thin roller, the line will be very close to the seam line without spilling over onto the tile like the brush would. This is the fan favorite by far. - Source: Internet
- A common issue with tile grout is the soap scum residue it attracts. The steaming method is useful for persistent stains and soap scum residue. Apply surface cleaner to the tiles on the floor and in the shower, then turn on the hot water until the steam fills the room. Wait 15 to 20 minutes to allow the steam to loosen the debris on the tiles before scrubbing the grout. - Source: Internet
- There are a few reasons why Aqua Mix Sealer’s Choice Gold Quart is the best sealer. First, it is a water-based sealer that does not require any special equipment or training to use. Secondly, it provides superior protection against staining and fading. Finally, it is backed by a manufacturer’s warranty. - Source: Internet
- The majority of individuals are unaware that their tile grout needs to be sealed. Contractors frequently fail to inform their clients (or else some may not even know). Give your tiles some love and protection now that you understand the need of sealing (and resealing) your grout, as well as how to do it yourself. They’ll look a lot better and last a lot longer. - Source: Internet
- And because we heard from more than a few pros that sealing grout is a great idea around six months after the initial sealing job- we figured we’d take you guys along for the ride in the form of a simple step by step tutorial so you can seal your grout right along with us if you so desire. Of course we should mention that if you start with dirty, cracked, discolored, or mildewed grout, sealing that will do nothing to keep it looking clean (since you’ll just be sealing those flaws in). So you might want to go to town scrubbing the heck out of your grout to get it back to its original glory before taking on this project. And those who are dealing with especially nasty grout can actually dig it out with a grout knife and regrout the whole tub or floor- which you can learn more about here in this post and by asking the experts at your local home improvement center. - Source: Internet
- Brushing on grout sealant is tedious, taxing work. If you have knee or back problems, you may want to skip this method in favor of the spray method. Or you’d prefer to use an applicator, though, be sure to wear kneepads, usually found in the flooring aisle of your local home center. - Source: Internet
- Aqua Mix Sealer’s Choice Gold Quart is the best product for natural looks and protection. This water-based sealer provides ample protection over the entire surface, including grout and tiles. It also dries with a no-sheen finish for a natural, non-slippery look and feels. For ceramic tiles, this will provide additional protection against staining and wear, and it can be used with stones such as granite, marble, masonry, and limestone. Use this as a pre-grout sealer on your tiles for extra protection in areas such as bathrooms or kitchens. - Source: Internet
- There is a lot of material out there that is inconsistent and misleading. Remember that grout is porous, so it absorbs both water and whatever is in it (e.g. shampoo, hair dye, cleaning products). You can prevent water and other items from infiltrating the grout by using a grout sealant. - Source: Internet
- It’s best to reseal your grout once a year, or every other year at the very least. While many sealers claim to last a year, keep in mind that strong cleansers can quickly degrade sealers (as well as foot traffic or water in the showers). Also, keep in mind that sealing your grout is simple and inexpensive…much less expensive than regrouting or attempting to remove mildew (or worse). - Source: Internet
- 1 | Only seal cement-based grout. Synthetic grouts that contain epoxy or urethane should NOT be sealed. Also do not seal grout that had a color or dye applied to it to cover up the dirt. - Source: Internet
- The process for sealing shower tile walls is much the same. We sealed the subway tile in our bathroom using a similar method below. We didn’t have to go through all of the steps since it was a new tile job so it will depend if your tile is existing or a new job. - Source: Internet
- Grout sealing is done to help protect grout from absorbing unwanted chemicals or cleaners into it. This will allow for easier cleaning of the grout because it prevents the chemicals from being absorbed into it. Learning how to seal grout is imperative to a lasting finish. - Source: Internet
- Be sure to check the package of grout to see the typical drying time. Different grouts dry at different times. Keeping the newly tiled room warm will help the grout cure. - Source: Internet
- The first step is to find the grout you need and the right amount. You don’t want to be over halfway finished and run out. You can always take back unopened containers or store them. It is best to seal your grout about once a year to prevent the buildup of mold and mildew. - Source: Internet
- Now you can apply the sealer. The first coat is applied to your grout lines. Wait five minutes before removing excess sealer with a clean cloth. Next, apply a second coat. Remember to wait five minutes before wiping away the excess sealer. - Source: Internet
- This depends on what kind of sealer you are using. Acrylic Latex Based Grout Sealers only need an hour to dry while Oil Based Polyurethane Grout Sealers will need 12 hours or more before your bathroom can be used again. Silicone Based Grout Sealers are typically safe to use within 6 hours. - Source: Internet
- Put on rubber gloves. Kitchen “dishwashing” gloves work well, and prepare sealer in whatever method you have chosen to use. Follow directions for each method. - Source: Internet
- What does sealed grout have over non sealed grout? Well, by not allowing moisture or dirt to penetrate the grout, it relegates these things to the surface, thereby protecting the look of your lines. In other words: white grout stays nice and clean and white. And any other colored grout looks as good as new (all while warding off mildew and other gross stains). And one tip that we heard from several tiling experts was that not only should we thoroughly seal our bathroom’s floor and wall grout two months back when we completed our big bathroom overhaul (learn more about that project here) but that we should go back in and reseal everything about six months afterwards- just to be sure we didn’t miss a thing and that we have a nice thick seal on everything (which can literally be the difference when it comes to having to scrub dirty grout lines to rid them of mold and mildew). - Source: Internet
- Next it’s just time to sponge on that sealer. I prefer to pour small amounts of sealant straight from the bottle onto my sponge by tipping it to get a good splash or two on there. Then I work in small sections to be sure that I don’t lose track of what I’ve sealed and what I haven’t and I apply the sealant in a circular motion, sometimes working back and forth or up and down to get the edges of things. This isn’t exactly a gentle process, you have to apply a good amount of pressure to work the sealant into those cracks. As you go you can subtly see what has been sealed and what hasn’t because the sealed sections of tile should look slightly wet and the grout usually looks a bit darker where it has been saturated. - Source: Internet
- The first thing is to clean the tile surface and inspect it for damage. Repair broken grout lines before you begin sealing. When installing new tile or fixing key areas, allow 48 hours for the grout to cure. - Source: Internet
- Unsealed ceramics are dirt resistant. Discoloration will impact your tiles if they’re not sealed. If you don’t know what kind of tile you have, ask your vendor. Also, grout sealer thwarts mold growth on tile joints. - Source: Internet
- When doing home remodels, you will often come across many chemicals that you should use caution when using. A sealant is no different. Always follow the safety guidelines on different products. - Source: Internet
- While people sometimes go back and forth on whether they should seal the grout in the shower, most people would agree that it is needed. It doesn’t cost much, is not too time-consuming, and will protect your shower. In the end, it does not hurt a thing to apply added protection to your shower. - Source: Internet
- As for the grout in the corner, it cracked because it was not compacted heavily enough. The corner is a bigger pain than the flat surfaces because there is often a bigger empty space behind. Dig out all the old grout with a utility knife or any sharp instrument. Buy unsanded grout and insert it in the crack with a squeegee; press it in so that it is completely compact. Then smooth off and forget about it until a day or two later when you can seal it. - Source: Internet
- Also, keep in mind that the goal is to keep the dirt out, not in. Grout sealing is a preventative measure to keep the colour and consistency of the grout. It’s too late if the grout begins to chip or change colour. I’d recommend incorporating this into your spring cleaning routine. - Source: Internet
- Make sure you apply the grout sealer to your grout according to the directions on your specific product. Each product is a little different. You can use a small brush, sponge, or clean cloth to apply it evenly over the grout. - Source: Internet
- Using a dry cotton cloth, wipe the tiles clean. It’s critical to wipe away any excess sealer from the tile. If the grout sealer has dried on the tiles, scrape it off with water and cotton pads. - Source: Internet
- This is the grout sealer we have used before and were very pleased with. Aqua Mix is the one that is highly recommend by tile professionals and is professional grade. It is more expensive, but does last for years. - Source: Internet
- After installing your tile, you must wait until the grout is completely dry before adding sealant. If there is any moisture at all, the grout sealer will not be able to soak into the grout to seal it. The time to dry is typically between 48 to 72 hours before it is time to apply sealer. - Source: Internet
- Another way to seal grout is by spraying the entire surface with a grout sealer. The idea is that the grout sealer penetrates the porous grout, yet lays atop the glazed tile surface. Then, the sealer on the glazed tile partially evaporates and partially wears off after usage. - Source: Internet
- Ceramic, porcelain, or stone tile is laid in a bed of mortar and left to cure. At this point, there are open seams between the tiles. When the tile is solid enough in its mortar that it will not shift around, grout is smeared across the face of the tile with the edge of a soft rubber float. As the grout reaches a seam, it is deposited in the seam and collects there. - Source: Internet
- Smaller tiles will use more grout than large tile patterns. Smaller tiles = More lines to fill. If you use small tile, it’s best to spray on grout sealer; it would speed up the process. - Source: Internet
- Many people do not realize that grout is a very porous material. It will absorb any liquid that comes in contact with the surface. With the kitchen backsplash, you may be able to get away without sealing your grout. But do you need to seal tile grout in the shower? - Source: Internet
- Step 1: Ensure grout is completely clean. You don’t want to seal grout that’s dirty. Once it’s completely clean, wait until the next day to apply your grout sealer. - Source: Internet
- If you don’t want to paint sealer on every single joint, you can opt for a spray sealant. I’m not a huge fan of spray grout sealer, but it does a decent job. Make sure you’re really vigilant about wiping off excess sealer that will be on your tiles if you use the spray option. - Source: Internet
- Because some soaps or conditioners are particularly prone to causing stains and buildup, swapping your shower products may help maintain clean grout. Check the ingredients on the back of your products and see if dyes or artificial colorings are listed. Switching these for more natural products will be better for both your health and the shower grout. - Source: Internet
- You want to avoid getting the sealer on the tiles, so take your time. Don’t worry if you get sealer on your tiles; simply wash it off with a rag as soon as possible. Most people find it easier to clean a few feet at a time, both to wipe and to avoid having to wipe. So that you don’t end up with a foggy film that’s nearly impossible to remove, remove sealer from the tile before it starts to dry (within five to seven minutes of application). - Source: Internet
- 5 | Work in small sections that can be finished in five to 10 minutes each. Make sure to thoroughly saturate the grout with the sealer. Then wipe away any excess sealer on tiles with paper towels after finishing a section. - Source: Internet
- If you’re working on a large grouted tile project, you’ll need to purchase a gallon of grout sealer. StoneTech Heavy Duty Grout Sealer is a great option for sealing both sanded and unsanded grout. It will protect your countertops, floors, or shower surrounds from water-based and oil-based stains, mildew growth, and other imperfections. Apply the sealer according to the manufacturer’s instructions for the best results. - Source: Internet
- Most grout is cement-based and porous, which makes it prone to getting gunked up with minerals, dirt, and soap scum. This can result in bacteria, mold, or mildew growth, which can stain and clog your grout and even affect your health. In addition, it’s common for grout to be light-colored, making it almost impossible to hide or fix discolored grout. - Source: Internet
- Tile grout works in two significant ways. First and foremost, it keeps debris out of the seams by displacing those open areas. Second, grout is a minor structural element that holds the tiles together. As an added benefit, grout adds to the beauty of the tile. If you choose color-tinted grout, the grout is far more than functional: it is an aesthetic device. - Source: Internet
- After you allow it to dry fully, then it is time for the second coat. The number of coats you will need depends on your desired level of coverage. You will know your shower is properly sealed when the water beads on the surface of the grout roll freely without soaking in. - Source: Internet
- Q. My shower stall was renovated with ceramic tile three years ago. Is it too late to seal the grout? Also, one grout joint in a corner has cracked, from the floor to the ceiling. How can I fix it so it won’t crack again? - Source: Internet
- Although shower tiles can make for a great bathroom aesthetic, the grout—the material that fills the space between tiles—often requires extra cleaning and TLC. Porous by nature, grout attracts debris and minerals, which in turn attracts mold and mildew. Not only is this an anti-aesthetic, but it can pose health risks. Fortunately, there are several inexpensive and simple ways for homeowners to maintain clean grout. - Source: Internet
- Once the grout is cleaned, it is important to protect it from dirt, mold, bacteria, and mildew. Buy a high-quality, professional-grade sealer. Read the directions carefully before starting applications. - Source: Internet
- 7 | Clean hazy overspill. Haze may appear if the sealer got on tiles by mistake. Simply wet it down with more sealer and wipe off with paper towels. - Source: Internet
- A one-quart container of grout sealer will seal around 200 square feet of grout with 12-inch tiles. The sealant is not that expensive when doing it yourself. If you hire a professional, it would easily cost hundreds of dollars. Typically, a one-quart container of grout sealer will set you back under $15, and a one-gallon name brand is as low as $30. Prices do vary based on location and brand. - Source: Internet
- Brush On – This type of sealer has a milky appearance and is applied directly to the grout with a small brush tip, though many do not choose this method. Make sure not to get any sealer on the tile; small spots will not hurt, though, but should be wiped off. Brushing on the sealant is a very tedious task. The sealant doesn’t always flow evenly out of the brush, causing a simple task to take an awfully long time – for days stuck in your bathroom sealing your tile, which could drive someone mad. - Source: Internet
- Grout sealant is important because it renders a porous material—grout—nearly non-porous. This is crucial in the high moisture environments of kitchens and bathrooms. Using grout sealant on a regular basis will add years not just to the grout but to the tile itself. - Source: Internet
Here are a few tips to help you find information about How Often Should I Reseal Grout?:
- Look for good places to get information about How late is too late when sealing grout?. This can be done in libraries, on websites, or even by paid journalists.
- When looking for information about How To Seal Grout In Shower, it’s important to know that there are different kinds of online sources, like Google and YouTube. Social media sites like Facebook and Twitter are also good places to look for information about how often do you need to seal grout in shower.
Video | How Often Do You Seal Grout In Shower
To get the best information about Can You Seal Tile And Grout At The Same Time, you should read to find out how true each source is.
This article has a few videos from different places about Do I Need To Seal Grout In Shower that will help you learn more about it. The Internet is a great place to find out about a wide range of things.
## Here are some crucial aspects concerning How Often Should You Regrout Floor Tiles:- How Often Do You Seal Grout In Shower
- How Often Should You Seal Grout In Shower
- How Often Should I Seal Grout In Shower
- How Often Do You Have To Seal Grout In Shower
- How Often Do You Need To Seal Grout In Shower

With so many websites and forums that talk about WHAT’S THE BEST WAY TO CLEAN AND SEAL GROUT?, it shouldn’t be hard to find what you need.
Most people are used to getting information about how often should you seal shower tile grout in a very different way than this. It lets you look at the information about Grout Sealer and how it can be used in more detail.
 ways to put information about Can You Seal Tile And Grout At The Same Time in a way that looks good and is useful. They can be used in business and marketing, and they can also be used to talk about What Happens If You Seal Grout Too Soon. So, we also give you some pictures about DIY Grout Sealer Guide For Tile Surface Projects.
In the end, this article gives a summary of How To Seal Grout In Shower. Also talked about are DIY Grout Sealer Guide For Tile Surface Projects and How often should you seal your grout?, which you can use to compare how much you know about How To Seal Grout In Shower.
