This time around, we shall cover Do You Seal Painted Kitchen Cabinets. Obviously, there is a great deal of information on How to paint kitchen cabinets – repaint your cupboards and units to give them a new look on a budget on the Internet. The fast rise of social media facilitates our ability to acquire knowledge.
What To Put Over Painted Cabinets To Prevent Chipping-related material is also connected to 5 Mistakes People Make When Painting Kitchen Cabinets and do you need to seal painted kitchen cabinets. As for further searchable items pertaining to How To Seal Painted Kitchen Cabinets, they will likewise have anything to do with do you seal painted kitchen cabinets.
116 Tips for Do You Seal Painted Kitchen Cabinets | The Best Clear Coat for Kitchen Cabinets
- Alkyd paints are your go-to product if you want to paint kitchen cabinets like a professional. Alkyd paint is not typically used on walls but is commonly used on metal or wood and cabinets. It is a good choice for cabinetry because it has a hard and durable finish. If you have to paint over alkyd, use another alkyd paint or oil-based paint for the best-looking results. - Source: Internet
- Leave your painted project to dry. Technically, you should be able to use your cabinets as soon as the wax is touch dry, but the full curing time of this wax sealant usually takes up to two weeks. Until such time, it would be best if you are gentle with your surfaces to prevent them from getting damaged quickly. - Source: Internet
- You can use either a brush or spray paint for your kitchen cabinets. Spray paint gives a smoother finish, but you may incur extra costs renting the spray equipment. Besides, when using spray paint, you’ll be required to mask off other areas of your kitchen to counter accidental sprays. - Source: Internet
- Even if your hardwood cabinets are in near-perfect condition, you still have to sand them down to the bare wood finish so the paint sticks, Gibbons says. She recommends sanding them lightly with 120-grit sandpaper or a sanding sponge. “But if your doors are engineered wood or MDF (medium-density fiberboard), you just want to sand lightly enough to rough up the surface for priming,” she says. - Source: Internet
- The last thing you want is for knots to show up on your cabinets weeks or months after you’ve painted them. The best way to prevent this is with primer. “Priming helps paint to adhere to surfaces and is a critical step if you’re painting cabinets,” Gibbons says. Consider Clare’s fast-drying, multi-surface paint primer that can help conceal any imperfections and even block stains. - Source: Internet
- Even if your kitchen cabinets aren’t glass-fronted, you may decide to paint the interiors to achieve uniformity with the exteriors. Matching the inside of the cabinets with the exteriors creates a cohesive and sophisticated look. You don’t have to worry about your cabinets looking weird any time you open them. - Source: Internet
- Question: My cabinets were painted a sage green by the previous owner. They are older original cabinets from the 60’s. What primer would you recommend to paint my cabinets white, and can I just finely sand them? - Source: Internet
- The key here is using thin coats of paint. This will limit the number of drips, pooling, and any other blemishes that can happen when painting. It will also give the cabinets a smoother finish in the end. - Source: Internet
- When painting wood cabinets, you’ll need to properly prep the surface before using latex paint. While oil-based paint goes on smooth, even over wood surfaces, latex paint is more likely to show variances in the grain or texture. If you want an even look, you’ll need to do some prep work beforehand to make your painting project successful. - Source: Internet
- It’s easy to paint MDF kitchen cabinets as long as you know how to properly prep them. When prepping MDF cabinets for painting, you have two priorities: seal the edge and use an oil-based primer. The edge of MDF is more porous, and if it doesn’t already have a finished surface, you’ll want to use some drywall compound to seal it and keep moisture from swelling the material during the painting process. - Source: Internet
- If you’re painting the cabinets a different color than they are currently, it’s also a good idea to lightly sand the surfaces. This roughs up the surface a bit, giving it more texture. More texture will help the new paint to stick better and create a more even finish. - Source: Internet
- If your cabinets are peeling, delaminating, sagging, breaking, or have large and visible damages, you will be better off replacing them. Repairing these damages and then painting them will cost a lot. Painting over the damages will only give them a new color, and the damage will cause the paint the peel or crack quickly. - Source: Internet
- It is not enough to just paint your kitchen cabinets for the sake of doing it or for beauty purposes; everyone would love to have long-lasting kitchen cabinets. It will be very disappointing going through the whole painting process only to realize that the paint is peeling off a few months after painting. To ensure that this does not happen, below are the best tips that will make your painted kitchen cabinets last longer. - Source: Internet
- The best roller to use when painting kitchen cabinets is a mini foam roller. The foam roller is dense which provides a smoother finish. If you were to use a regular napped roller, you’d get a textured finish. I prefer using this type of roller. - Source: Internet
- If you choose to paint them white, latex paint is a better choice than oil-based paint. Although oil-based paint is more durable, white oil paint does turn yellow over time, changing the color. Acrylic latex enamel, like Pro Classic, is a durable option for cabinets, and it doesn’t yellow. Urethane-modified acrylic enamel is also a good choice to consider. - Source: Internet
- Yes, you can paint over already painted cabinets however it may require some additional work. If your cabinets are chipping and the paint is peeling, you will have to scrape the chipping paint off the cabinets. Then you have to sand them smooth. You may need to add wood filler or Bondo to make them smooth again. - Source: Internet
- Advances in water-based paint formulas have made it much easier to use latex paint for kitchen cabinets. Many latex paints are now produced with greater durability for cleaning and can stand up to a good scrubbing. This is a must for a kitchen, so look for paint that is described as washable or scrubbable for your cabinets. - Source: Internet
- Oil-based paints are known for their resilient finish, so they may be your first thought when considering the best color for your kitchen cabinets. Oil-based paints make a surface super easy to clean. If you open a cabinet with sticky or greasy hands, you can easily scrub away any residue without worrying about wearing out the paint or dulling the surface. However, oil-based paints have some flaws that become especially hard to ignore when painting cabinets. - Source: Internet
- The total cost of painting kitchen cabinets will also depend on how many coats of paint you need. A single gallon of paint will usually be enough to cover two coats for most cabinet projects. The amount of paint depends on how many cabinets you need to paint and if you’ll be painting the shelves and box interiors. - Source: Internet
- It is important to clean all surfaces before painting cabinets. This will ensure that the paint adheres properly and does not chip or peel off later on. If there is oil, dirt, or anything else between the cabinets and the new paint, the paint won’t stick as well. This means you will have to repaint them again sooner rather than later. - Source: Internet
- Now it’s time for the primer. If the cabinets are heavily stained, use a stain-blocking primer, which dries quickly and seals knots and other surface defects that might bleed through the topcoats. In most situations, however, stain-blockers shouldn’t be necessary, and an oil-based or 100 percent acrylic latex primer will work just fine. - Source: Internet
- Preparing your kitchen cabinets for painting can be a relatively inexpensive project if you do it yourself. All you need is some basic supplies and a little bit of time. However, the cost of painting kitchen cabinets can vary depending on the paint and supplies you choose. - Source: Internet
- This is a very crucial step in the process. You must clean and degrease your cabinets of any built-up residue, cooking grease, or dirt. This degreaser is great to use for this step. Having a clean starting surface will ensure you get the best end result. - Source: Internet
- Another rustic style is the distressed look, which doesn’t require a special paint. This finish is made up of layered colors and spattered dark paint. When the paint is dry, to reveal the colors underneath, distress the finish by hitting it with a chain and lightly sanding in the spots where the cabinets get the most use. - Source: Internet
- If your cabinets have a wood veneer (essentially a very thin layer of real hardwood over a pressed material), you must sand it before painting your kitchen cabinets. Before you break out the sandpaper or paint, inspect the veneer for loose edges, chips, or cracks. Repair these first with wood glue before sanding the surface. Also, don’t sand too much—you’re just looking to make the surface rough enough to give the primer and paint something to adhere to. - Source: Internet
- The edges where the wall boxes meet the wall should also be caulked before painting the cabinets white. If you decide not to use caulk, the un-caulked look of painted doors looks fine too as long as you’re careful to keep the gaps free from paint globs and debris. I blow out the gaps with my air compressor before I spray paint. - Source: Internet
- Answer: I’ve used the Sherwin Williams color Snowbound many times on cabinets. The color Alabaster also looks nice. It’s more of a cream white. - Source: Internet
- Yes, it’s frustrating to wait days for paint to cure. But if you accidentally smudge the paint, you have to sand the door and repaint it (a hard truth any woman who’s rushed to leave the nail salon surely understands). It’s worth the wait though. “Painting cabinets can be tedious, but if you take your time to do it the right way, you’ll be so happy with the results,” Gibbons says. - Source: Internet
- Painting your cabinets is an easy kitchen update. The experts begin by removing the doors because you’re less prone to runs and drips if you paint horizontally. Most just unclip at the hinges. - Source: Internet
- For one thing, while it goes on smoothly, oil-based paint takes a long time to dry between coats—up to 16 hours. Without good air circulation (which can be hard to come by in a kitchen), you may end up waiting days for the paint to dry. Keeping cabinets empty for days as the paint dries between coats is a nuisance many people aren’t willing to deal with. Additionally, surfaces covered in oil-based paint can take on a yellow tint over time (especially in low-light conditions), so your cabinets may start to look dingy. - Source: Internet
- Chalk paint is a great choice to use on kitchen cabinets. In order to keep your freshly painted cabinets looking brand new, it is highly suggested to add a layer of wax sealant to your chalk-painted surfaces. This will ensure that the paint will not chip off or scratch, and it will also give your chalk paint a nice finish. - Source: Internet
- Thoroughly clean your cabinets before applying the paint to give it a fresh start that will ensure final painting is permanent. Make sure the cabinets’ surfaces are as sparkling as possible keeping in mind the fact that any traces of greases left on the surface will hinder paint from penetrating deep into the wood. After sanding, wipe thoroughly the wooden surface to eliminate the possibility of dust particles mixing with fresh paint. - Source: Internet
- Wood-laminate, metal, and wood cabinets are easier to paint than other cabinet materials. Some materials need specific paints and processes to get the paint to stick to them. Plastic-laminate cabinets are a good example of this. - Source: Internet
- Here you’ll mostly deal with the hard-to-reach innermost parts of your cabinets. Additionally, some interior parts may need you to paint upside down, which can be pretty challenging. And depending on the design of your cabinets, you may need to remove the doors before painting the interiors. - Source: Internet
- Hi, I am painting my kitchen cabinets. They are primed and I plan on using a gloss white oil based paint. I have been told that I also have to seal anything that I paint. Was told that Minwax polycrylic (sounds like varnish to me) is a good sealer. Is this true? Do I have to seal? Can I use a satin polycrtylic on top of the glossy oil paint? - Source: Internet
- On the other end of the spectrum is a high-gloss finish, which will transform your kitchen into a polished, modern space. To shine up your cabinets, paint a high-gloss clear acrylic varnish over your final coat. This technique will add depth to the color and cover the surface of your kitchen with a glassy sheen. - Source: Internet
- Surface cleaning is really important when prepping cabinet doors for white paint. Paint doesn’t stick well to dirt or grease. If you paint over surface contaminants, you’re going to have problems. Before you prime and paint your cabinets white, clean them with de-greaser, soap, or TSP. - Source: Internet
- If you choose to paint the shelves, you will first remove them from the cabinets and lay them flat on a work surface. Apply primer to all surfaces of the shelves, then paint them using a small brush or roller. Allow the primer and paint to dry completely before reattaching the shelves to the cabinets. - Source: Internet
- Painting kitchen cabinets is simple, but it gets tricky for the cabinet’s interiors. Doing so is a good way to add life to the cabinets. You can either reduce the contrast between the interiors and the cabinet doors or create a pop of color to make the space more eye-catching, whichever suits your needs. - Source: Internet
- If you’re open to spicing up your kitchen’s look, incorporating a faux finish can transform its style into shabby chic, rustic, provincial, or modern. Crackling glaze, which is available at paint stores, can, with very little effort, give your cabinets a weathered look. Just apply the glaze over a dry base coat, brushing in only one direction (thick for large cracks, thin for fine cracks), and let it dry. Finish with a flat topcoat of the base color brushed on perpendicular to the glaze. The paint will start to form cracks as it dries, a process that takes about an hour. - Source: Internet
- Another thing some users dislike is the smell, which can be overpowering if you’re not expecting it. Ensure you only coat cabinets in a well-ventilated space when using this prouct. But as it dries quickly, the nightmare will be over quickly. - Source: Internet
- Today I want to share the steps on how to paint kitchen cabinets and get a smooth finish like the pros. Along with a few tips and tricks to make the process as smooth as possible. Also, I’ll answer a few of the most asked questions regarding painting kitchen cabinets. - Source: Internet
- Answer: With the drying/spray rack I use and recommend in the article for cabinets, the rack comes with special holders for carrying a wet door to the drying rack. When carrying a door, the holders grip only the corner edges on the sides of the door so it doesn’t leave marks. The holders have a rough texture on them to prevent the door from sliding off. All three of the racks I own came with two different size holders for big doors and smaller ones. - Source: Internet
- : Another great option for kitchen cabinet paint, this is the shiniest paint choice. It’s great for incredibly bold cabinet colors or super modern kitchens. Gloss paint is also the most durable because more resin and binders are used in formulating glossy paint, giving the paint more of a hard “shell.” Eggshell or flat finish paint: Avoid using either of these finishes when painting kitchen cabinets. Eggshell and flat paints aren’t as washable as semi-gloss or gloss finishes, and you risk rubbing through your paint job the next time you need to scrub your cabinet doors clean. - Source: Internet
- You can also build a drying rack for the painted kitchen cabinets. One way is to set two 2x4s between two small ladders to create a flat surface. Then, screw eye hooks into both planks of wood so you can hang your painted cabinet doors and drawers on them. - Source: Internet
- As great as this crystal clear finish is, you knew there had to be a downside. However, it’s not a big one. Like every other clear coat for cabinets on this list, test it out before applying it on any white-painted cabinets. - Source: Internet
- Chalk paints are specially mixed paint that lends a chalky, matte-like appearance to the surfaces it is painted on. One of the places where chalk paint can be used is on kitchen cabinets. This is because chalk paints give kitchen cabinet surfaces a rustic, vintage feel to them. If you’re planning to re-paint your cabinets with this type of paint, you might be wondering how to seal them to make them last longer. - Source: Internet
- As with varnish and shellac finishes, dust and dirt control is critical with polyurethane. Cover all ducts carrying air currents blowing from heating and cooling. Avoid doing anything that would cause dust to become airborne, especially sweeping the floor just before the finish to the kitchen cabinets is applied. Use a tack cloth to remove dust from the work. - Source: Internet
- It is much faster than demolishing and removing old cabinets and installing new ones. Painting your kitchen cabinets is more affordable than installing new cabinets. It allows you to avoid a major renovation and keep the same layout as your existing cabinets It’s environmentally friendly. You avoid throwing out perfectly usable materials just for a new cabinet color. - Source: Internet
- This step depends on the shape of your cabinets and if you are changing out your kitchen cabinet hardware or not. If you are and the new hardware you chose doesn’t line up with the old holes, now is the time to fill them. Patch the holes and any other imperfections with a high-quality filler like Bondo and let that dry. - Source: Internet
- Unless you’re using chalk paint on your cabinets, they need to be primed, but not with a latex primer, unless they’re already painted and in good condition. An oil- or shellac-based primer will completely seal the sanded surface and form a strong bond with paint. Latex primer does not seal wood tannin and tough stains. - Source: Internet
- Run masking tape along the edges of the cabinets to protect walls and surfaces you don’t want to get paint on. It’ll also help to create a crisp edge. Cover worktops, floors and appliances with a sheet to catch paint drips. - Source: Internet
- If you’ve noticed the cost of new appliances, countertops, and cabinets, it’s no surprise that renovating a kitchen is one of the most expensive remodeling projects. While few homeowners find ways to boost the look of a dated refrigerator or tired granite, transforming a kitchen by freshening the cabinets that make up most of the room’s visual space is entirely within reach. But there’s more to the job than buying a gallon of your favorite color. - Source: Internet
- Whatever paint you choose, it’s best to choose one that dries fast so you don’t have to wait long to apply the second coat. Latex is the best choice because it dries faster than oil and won’t cause the white paint to yellow. Another advanced option to consider is spraying your cabinets white with pre-catalyzed lacquer, which is what I use now for all of my cabinet projects. - Source: Internet
- This crystal clear polyurethane can be applied on stained, bare, or painted wood surfaces. However, you should test it on white-painted kitchen cabinets before committing. In some cases, it might yellow. - Source: Internet
- adhesion. Use 100-150 grit sandpaper and sand the cabinets. You don’t need to complete sand off the finish, sand it just enough to all the primer to adhere properly. - Source: Internet
- Of course, there’s no right or wrong color for your own kitchen. But for cabinets, it’s important you get it right the first time. “This project is easy, but it’s not the kind of job you’re going to want to redo any time soon if you don’t like the color,” says Petersik. - Source: Internet
- Semi-gloss or satin : Semi-gloss is the best finish for painting kitchen cabinets. Because it has some sheen, semi-gloss paint will help reflect light and be more durable in the long run, which is essential in a kitchen environment. Semi-gloss paint is often described as washable and more resilient to being scrubbed clean. Semi-gloss and satin finish are similar, but semi-gloss has much more sheen than satin. That means light from windows and lamps will bounce off semi-gloss paint more easily than a flatter finish, like eggshell or satin. - Source: Internet
- When you apply polyurethane varnish, you’re actually sealing it in plastic. It is a plastic so tough that hardly anything can penetrate it. In addition to this exceptional durability, polyurethane is easy to put on; fairly fast-drying; super-resistant to chemicals and water; and available in low-gloss, satin, and high-gloss finishes. It also comes in oil based and water based. - Source: Internet
- Be sure to follow the steps we outlined carefully, and don’t forget to allow enough time between each step for the cabinets, primer, paint, etc., to dry completely before moving on to the next one. If you run into any problems or have any questions, feel free to contact us for help. - Source: Internet
- Paint adheres best over a scuffed surface, making true wood cabinets a great candidate for painting. Sanding the surface helps prep it for paint and results in a better bond and smoother finish. This is crucial if your wood cabinets are already stained or have a glossy finish. You will need to get through this finishing layer with sandpaper or a liquid deglosser. - Source: Internet
- Answer: Satin paint will hide wood imperfections more than semi-gloss simply because it’s less glossy. If hiding imperfections is a concern with your older cabinets, a satin, or even an eggshell finish, will help with that. You can also use paint with good hiding properties. - Source: Internet
- Primer not only ensures good adhesion of paint, but it also increased the paint durability. Did you know primer has plastic in it? It helps your projects be more durable! With 4 kids I have seen the need for a primer on every project, whether it is doors, cabinets, or walls. The primer also protects the wood beneath your paint. - Source: Internet
- Sanding is a crucial step in the cabinet painting process. It helps the bond of the primer and paint. Now, the is a way to paint kitchen cabinets without sanding and that’s by using chalk paint. - Source: Internet
- If you’re not sure which option is best for you, try spraying a small section of your cabinets and seeing how you like the results. Spraying can be easier than brushing if you get the hang of it. With spraying, you can always go back and brush or roll over any areas that you’re not happy with. - Source: Internet
- Painting kitchen cabinets can involve paint brushes, rollers, or even a sprayer. Brushes and rollers are easier to start using, but you need to use them carefully so you don’t leave streaks or other marks. Sprayers are a little more difficult, but once you get used to them, you can paint more quickly and better. - Source: Internet
- I understand that not everyone has access to a paint sprayer. But don’t let that stop you from painting your kitchen cabinets. You can still achieve a smooth cabinet finish by using a high-quality roller and paint brush. - Source: Internet
- Unless you are using chalk paint which doesn’t require a primer, make sure that you prime your cabinets well before painting. Kitchen cabinet painting is a major undertaking and not one I would want to have to do twice because of paint peeling. Use a good, primer such as Cover Stain. - Source: Internet
- Chances are you’ve spotted painted kitchen cabinets on Instagram or Pinterest and thought of recreating the striking look in your own space. However, it’s easier said than done, since there are a slew of painted kitchen cabinet mistakes to consider before you even think of grabbing your paint brush. From cleaning the wood thoroughly to sanding surfaces, there’s no way around handling the prep work that’s needed to ensure a smooth paint job without any brush marks. Plus, once you’re finally done painting your cabinets, you need to give them at least a few days to dry to make sure your hard work remains intact. In other words, it’s an involved process. - Source: Internet
- Before applying polyurethane, complete the preparation steps for either stripping paint or preparing for new paint. These steps may include using paint remover, sanding and filling and sealing. If you’ve applied a stain or wood filler to the surface, make sure it is absolutely dry before adding the polyurethane. - Source: Internet
- Let your surface dry for about one to two hours, or until touch dry. The curing time for polycrylic topcoats may depend on the relative temperature and humidity of your area, and this may last up to about two weeks. During this time, it is important to use your freshly sealed surface with gentleness and care in order to prevent it from chipping. - Source: Internet
- Not all polyurethanes are clear. Some are colored to resemble pigmented shellac. With these, you’ll usually need to apply several coats of the finish to reach the color tone that you want on your kitchen cabinets. Each coat will produce a deeper tone; so try a test run on a scrap of the same material to determine how many coats you will need. - Source: Internet
- The other important thing to remember is to use an oil-based primer. Due to the more porous nature of MDF, water-based primers can swell the surface. Use an oil-based primer for the first coat, then paint the kitchen cabinets with water-based latex paint without worrying about moisture absorption. - Source: Internet
- If you’re sanding the cabinets yourself, use an orbital sander. Sanding doors by hand sucks, and an electric sander does a far better job anyway. The sandpaper grit you choose really depends on the type of wood. For maple cabinets and other types of wood I paint I use 220-grit most of the time. You don’t have to use really rough sandpaper for cabinet prep. - Source: Internet
- Hi there I started painting my cabinets with BM primer when I saw yellow tannins. I cleaned and sanded then used the primer before I read that BM whites can yellow which is the color we want to use. If I switch to SW pro now, do I need to sand all this primer off? What SW primer should I use? Thank you!! - Source: Internet
- To strip the cabinets, you will need to use a paint stripper. Follow the manufacturer’s instructions on how to use the paint stripper. You may need to apply it multiple times to get all of the paint off. - Source: Internet
- I’ve had a few inquiries from followers of my site asking for tips on painting kitchen cabinets. A new coat of paint on your cabinets can make the entire kitchen have a facelift. With all the great new colors and DIY tutorials, it is no wonder why painting kitchen cabinets are becoming popular. - Source: Internet
- Painting your kitchen cabinets is a great way to customize your kitchen space to your preference or keep up with the current interior décor trends. However, when painting your kitchen cabinets, one question that may run through your mind is whether you need to paint the inside of the cabinets as well. Let’s find out! - Source: Internet
- Not sanding is a mistake you don’t want to make when prepping cabinets for paint. Imagine a couple months later you try to clean your painted cabinets and the white paint rubs off. Although some primer brands advertise that sanding isn’t needed, you should always sand because it provides a better bond and a smoother finish. - Source: Internet
- The trick to painting your cabinets is in the preparation. Ideally, you should sand down cabinets before painting them as this gives the new paint a good surface to grip to. If the cupboards are bare wood then you don’t need to sand them. If your cabinets have a factory finish, sand lightly with 120-grit sandpaper or a sanding sponge. - Source: Internet
- Seal off all parts that are not to be painted using a masking tape. With the aid of wood filler, seal all visible holes on the wood surface and finally sand the cabinet starting with the hard parts, forgetting the door ends. For stained cabinets, you can use a stronger sandpaper like grade 220 which will ensure that all areas are clean and smooth to guarantee uniformity when applying the final paint to the cabinets. - Source: Internet
- Oil-based paint is the traditional choice for painting kitchen cabinets. It offers a durable finish and can be used on both wood and laminate cabinet surfaces. However, it can be slow-drying and smelly, so it’s not ideal for everyone. - Source: Internet
- Painting your kitchen cabinets is an amazing alternative to investing in new ones. It’s a fantastic budget-friendly way to update your kitchen without the inconvenience of an expensive full-scale kitchen renovation. Kitchen cabinet painting is the best way to get a new look without the hassle. - Source: Internet
- You may not need a complete kitchen remodel, but you can still spruce up the look of your space with a fresh coat of paint on your cabinets. The process is simpler (and less costly) than installing brand-new cabinets, and it’s a DIY that’s within the abilities of most homeowners. As long as you choose the right paint for your kitchen cabinet style, you can transform the look of your space while covering up dull, dingy surfaces. - Source: Internet
- Before you head out to the paint store, however, examine your cabinets to see if they can be resuscitated in the first place. Even the highest-quality paint job can’t revive cheap cabinets that have grown frail with age. Thin veneers peel or delaminate, particleboard cabinet bottoms or shelves sag or break, and hanging rails come loose. If these are the issues you’re dealing with, you’d actually be better off replacing your kitchen cabinets. - Source: Internet
- There are a few different ways you can go about painting cabinets. They all may or may not be an option for you. It all depends on what painting tools you have available to you. - Source: Internet
- While it’s not mandatory to include a sealant, applying one to painted cabinet interiors reduces chipping. If you choose not to add a sealant, the cabinets will still be functional in its absence. However, it’s highly advisable to include it for the high-traffic cabinets that you use more often. - Source: Internet
- Open the door to new possibilities by painting your kitchen cabinets in a bold, fresh color, or opt for a classic look with a crisp shade of white. Whatever color you choose, you’ll need to pay special attention to selecting the best paint for your kitchen cabinets to ensure a long-lasting and easy clean finish. And keep in mind that spraying your kitchen cabinets vs. using a paint brush will yield a more professional finish. - Source: Internet
- Low-gloss polyurethanes are less durable than high-gloss products. Use low-gloss finishes as top coals to cut the shine off high-gloss coatings underneath. High gloss is recommended for applying to kitchen cabinets. - Source: Internet
- Hybrid enamel paint is often considered the best for kitchen cabinets because of its low-maintenance properties. Hybrid formulations do not emit as many fumes or VOCs and are easier to clean up with soap and water. They are strongly adhesive. Alkyd paints require less prep work and do not need sanding. - Source: Internet
- When it comes to painting kitchen cabinets, it’s important to use the right type of paint. You will want to use the right type of paint finish too. This will ensure that the cabinets look their best and last for a long time. - Source: Internet
- If you’re looking for a professional and reliable cabinet painting service, be sure to contact Tribble Painting. We offer a wide range of services that are designed to meet your every need. Our team of experienced professionals is ready and waiting to help you achieve the perfect paint job for your kitchen cabinets. Fill out our contact form today so we can start talking about your painting project! - Source: Internet
- Now that you have finished painting your cabinets, it’s time to put everything back in its place. Make sure to follow the same order in which you took them out and follow the labels so each part goes back to where it belongs. Be careful not to damage your paint job. - Source: Internet
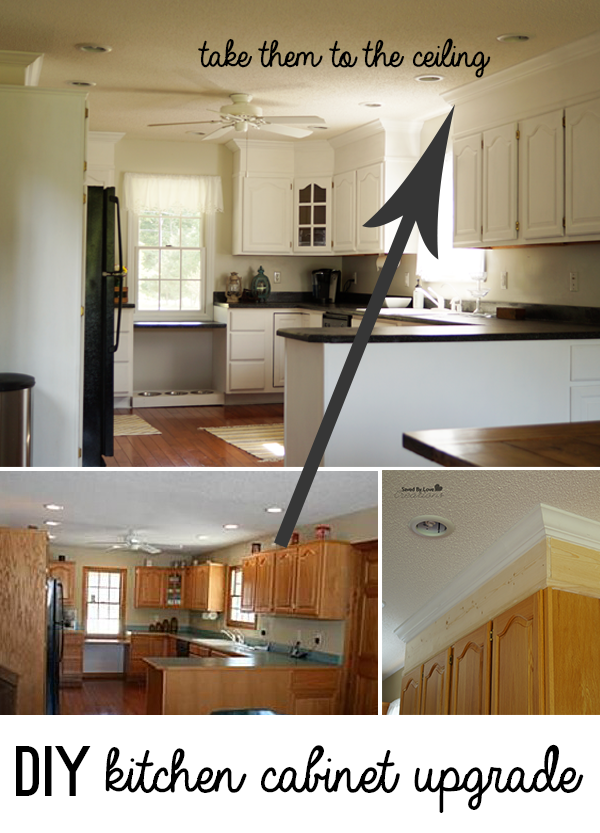
- A picture is worth a thousand words. Looking at before and after pictures of painted kitchen cabinets can help you envision your cabinets painted. It may help you decide to give this process a try. - Source: Internet
- Choosing the right paint finish for kitchen cabinets is essential since it affects the durability of your cabinets in the long run. Cabinet doors and drawers are subject to touching, pulling, and slamming, while shelves routinely have objects being slid in and out. These factors can make painted cabinets subject to scratching and chips, but you can lessen this risk by choosing the right paint finish for kitchen cabinets. - Source: Internet
- The third and fastest cabinet painting method is using a paint sprayer. This is the preferred method for many paint professionals. If you want a guaranteed smooth finish on your kitchen cabinets, a paint sprayer is a great option. - Source: Internet
- If your kitchen cabinets are already painted (instead of natural wood), you have an additional reason to use latex paint. A water-based latex formula is the safest option if you don’t know what type of paint is already on your cabinets. Oil-based paint won’t adhere well over latex paint, but you can use latex on oil-based paint, as it can bind to a surface treated with either type of paint. - Source: Internet
- You want to make sure all hardware is removed from the cabinet drawers and doors. Once that is completed, you need to move the tape you have put on the cabinets. I know, I know, we just put it there! Stay with me though. - Source: Internet
- You can apply a clear polyurethane finish over paint. Don’t expect the polyurethane to hide any defects in the material. In addition, if you are painting your kitchen cabinets solid white, you must understand they will yellow somewhat over time. - Source: Internet
- Painting laminate kitchen cabinets is possible, but it’s more tricky than painting wood or MDF cabinets. Laminate is a printed plastic that is adhered to a base layer (usually a composite material). The material is slick, so you’ll have to ensure you put in the prep work for a quality finish. - Source: Internet
- Most specialist cupboard paints are suitable for all wooden and acrylic cabinets. However, it’s important to bear in mind that non-solid wood finishes, such as stainless steel, vinyl or laminate are more difficult to paint, as the paint can chip or peel. If you’re opting to paint laminate-finish cabinets, they require a special bonding primer before you apply the paint. - Source: Internet
- No, not because we enjoy doing extra work, but this is for when we paint the cabinets. You don’t see behind the hinge which makes it the perfect place to put your piece of tape. As for the other piece of tape on top of the numbered ones, that protects the number from paint. - Source: Internet
- If you decide to paint the inside of your kitchen cabinets, consider using either latex or oil-based paints. Latex paints are easy to work with and clean with water, and they are also user-friendly. Oil-based paints take longer to dry, but they’re more durable. - Source: Internet
- Primers create a sound base for the paint, and will stop knots and blemishes showing through. The type of primer depends on the surface you’re painting – just read the tin or opt for a universal primer like Ronseal’s One Coat All Surface Primer and Undercoat. Wood primer is only for bare, unpainted wood. - Source: Internet
- The first step in the how to paint kitchen cabinets process is preparing your kitchen and a separate area for your cabinet painting project. This means clearing all the cabinets and countertops, removing all the hardware, and vacuuming or dusting the surfaces. A garage or similar workspace you don’t mind painting in and getting messy is necessary for painting the cabinet doors and drawers. - Source: Internet
- The first method you can use to paint your cabinets is with a paint brush. This may be the most time-consuming method however, you can certainly use a paint brush and still achieve a smooth finish on your cabinets. The key to this method is using a premium paint brush. - Source: Internet
- If your wood cabinets are bare, natural wood, they probably need little-to-no sanding. However, know that they will absorb a lot of paint, especially if you go with water-based latex paint. A primer will assist in making sure the coverage is even and thorough. - Source: Internet
- Most professional painters have a space they dedicate to painting cabinets. They have an area that can get paint everywhere, large worktables, and other tools and materials. If you don’t have anything like this, you can put boards on top of buckets and drop cloths around the area. It’s best not to use sprayers outside because the wind can send paint everywhere. - Source: Internet
- Tip: To speed up the drying time for doors, you can twist two screw hooks into holes drilled in an inconspicuous door edge (the lower edge for bottom cabinets, the upper edge for top cabinets). Paint the door’s outside face and let it dry for an hour while resting flat, then tilt the door up onto its hooks and put a drywall screw into an existing hardware hole. Hold the tilted door up by the screw and paint the door’s back side. - Source: Internet
- The best paint for cabinetry is one that levels when applied to reduce visible brush strokes and orange peel texture in the paint as it dries. The leveling paint I used a lot in the past on cabinets is Pro Classic semi-gloss from Sherwin Williams. I have also used Emerald urethane enamel many times. - Source: Internet
- All types of wood require at least two coats of oil-based polyurethane. The first coat works as a primer and sealer; the second serves as a finish coat. With water-based polyurethane, a third coat is recommended, because the finish wears away fairly quickly. Sand between coats if dust or lint gets into the wet finish. Sanding also makes it easier to tell where you applied the subsequent coat. - Source: Internet
- Using the 220 grit sandpaper, lightly sand all surfaces (front and back) as even as possible in preparation for the final finish coat of paint. Now is a good time to inspect your cabinets for any blemishes that may have occurred along the way. The next step is the final coat of paint, so it’s crucial you make sure they are perfect for that glass-like smooth finish on your cabinets. - Source: Internet
- I know painting your kitchen cabinets can seem a bit daunting and labor-intensive. Don’t get me wrong, it’s no walk in the park, but it can be done. As long as you follow all of the steps, especially the ones that go into the preparation, you can achieve smooth painted kitchen cabinets. If you put in the time and effort you will have the kitchen cabinet makeover you’ve been dreaming of. - Source: Internet
- Cabinets for a 10-by 12-foot kitchen can easily top $5,000—and your new cabinets may actually be of lower quality than the ones you’re replacing. On the other hand, a few fresh coats of paint can go a long way toward transforming your existing cabinets for a fraction of that price. In fact, the cost of painting should be no more than about $200, plus a weekend or two of your time. - Source: Internet
- If you’re like most people, your kitchen cabinets are one of the first things that you notice when you walk into your kitchen. And if they’re outdated or don’t match your current taste, it can really bring down the whole look of the room. This is when DIY homeowners look up ‘how to paint kitchen cabinets.’ - Source: Internet
- Let me first start by saying we paint a ton of kitchen cabinets. And when I say we, I mean the extremely skilled professional painting crew we have. They have been painting kitchen cabinets for years and have perfected the process. - Source: Internet
 Here are some recommendations for locating information about How To Seal White Painted Cabinets to get you started:
- Research Varnish For Painted Kitchen Cabinets-related information from credible sources. This includes libraries, websites, and even journalistic professionals.
- When researching Chalk Paint Kitchen Cabinets FAQ, it is vital to be aware of the numerous sorts of electronic media sources, such as Google and YouTube. Social media networks, such as Facebook and Twitter, are also likely to include information on should i seal painted kitchen cabinets.
Here are some recommendations for locating information about How To Seal White Painted Cabinets to get you started:
- Research Varnish For Painted Kitchen Cabinets-related information from credible sources. This includes libraries, websites, and even journalistic professionals.
- When researching Chalk Paint Kitchen Cabinets FAQ, it is vital to be aware of the numerous sorts of electronic media sources, such as Google and YouTube. Social media networks, such as Facebook and Twitter, are also likely to include information on should i seal painted kitchen cabinets.Video | Do You Seal Painted Kitchen Cabinets
To obtain the most accurate information on Best Sealer For Painted Kitchen Cabinets, it is essential to investigate the credibility of each source by reading.
This page contains multiple do you have to seal painted kitchen cabinets-related films from a variety of sources, which can expand your understanding about How To Seal Painted Kitchen Cabinets. Internet is an excellent resource for getting information on a range of subjects.
## Here are some crucial aspects concerning Sealing Cabinets:- Do You Seal Painted Kitchen Cabinets
- Should You Seal Painted Kitchen Cabinets
- Should I Seal Painted Kitchen Cabinets
- Do You Need To Seal Painted Kitchen Cabinets
- Do You Have To Seal Painted Kitchen Cabinets

With so many websites and forums giving How to Paint Your Kitchen Cabinets-related information, it is not difficult to locate what you want.
This is a highly unconventional method for obtaining knowledge on Best Sealer For Painted Kitchen Cabinets, compared to what most people are accustomed to. It permits a more in-depth examination of the content and application of information regarding Should You Wax Painted Kitchen Cabinets.
 Methods for creating aesthetically pleasing and informative presentations of Tips for Painting Kitchen Cabinets White information. They can be utilized in business and marketing environments to convey messages regarding should i seal painted kitchen cabinets. Consequently, we additionally supply photographs regarding What To Put On Cabinets After Painting.
This article concludes by providing an overview of Kitchen cabinet paint and seal. In addition, should i seal my painted kitchen cabinets and Best Sealer For Painted Kitchen Cabinets are discussed to compare your understanding of How To Seal Painted Kitchen Cabinets.
