This time around, we shall cover How To Change A Shower Head With Hose. Obviously, there is a great deal of information on How To Add A Handheld Shower Head To An Existing Shower on the Internet. The rapid rise of social media facilitates our ability to acquire knowledge.
information about Replacing Shower Head And Handle is also related to How to Replace a Handheld Shower Head and How to Install a New Handheld Shower Head. As for further searchable items pertaining to Shower Heads, they will likewise have anything to do with How to replace a shower hose.
60 Unexpected Facts About How To Change A Shower Head With Hose | Handheld Shower Head
- Before we start taking off the old hose, remember that even though the fittings might look the same, some shower manufacturers have their own hose fittings specifications. The cones on the end of the hose thus might not fit properly, resulting in leaks. This can be very annoying, so it’s worth getting a new hose from the same manufacturer. Otherwise, get a shower hose that has a universal fitting. - Source: Internet
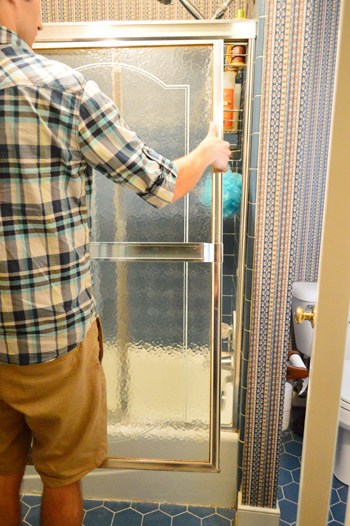
- Our main bath was last updated in the 80’s, but luckily the white and black tile is pretty timeless. One thing that desperately needed to be replaced was our old shower head! It leaked and wasted a lot of water. Plus, it only had two settings: lackluster spray and dribble. - Source: Internet
- Replacing a shower head pipe (also known as a shower arm) is not much harder than replacing just the shower head. To remove the old pipe, use a wrench to rotate the pipe counterclockwise. Clean the connection and replace the Teflon tape. Turn the new shower head pipe clockwise on the taped fitting. After it is installed, check for leaks. - Source: Internet
- To ensure that your new hardware works properly and water flows freely in the long run, clean your shower head at the first sign of clogging or lower water pressure in order to keep scaly buildup at bay. You can either use a cleaner or unscrew the head and put it in the dishwasher. Whatever maintenance approach you choose, just make sure to regularly clean it so you’ll have a refreshing shower for years to come. - Source: Internet
- Finally, wipe the connection point to ensure it is dry then turn the shower on and watch for any leaks. Hold a piece of kitchen or toilet roll around the joint. If there’s even the slightest leak, it will soon soak into the paper and become obvious. - Source: Internet
- Clamp the adjustable wrench around the end of the hose where it meets the wall pipe, and turn it counterclockwise. Once it’s loose, unscrew it the rest of the way by hand until it comes off. Drain any water left in the hose before taking it out of the tub. - Source: Internet
- Hold your new hose and place a sealing washer at the open end that fits onto the shower unit. Screw this cone onto the threaded fitting until it is hand tight. It’s worthwhile reading the installation instructions that came with the hose so that you install it properly with less chance of a leak. - Source: Internet
- Now that everything is installed, you can test the handheld shower head. If there are any leaks, try tightening them up by hand. If you are unable to tighten them by hand, you can use a adjustable crescent wrench or channel lock pliers. Just note, you need to be careful and gentle when using tools since these parts are made of plastic and they can crack and the threads can strip. - Source: Internet
- First, remove the old showerhead from the hose by turning the connecting cone anti-clockwise. You may need help with this so place a rag around the cone and use a pair of pliers. Remove the head and place the old washer somewhere safe. - Source: Internet
- Luckily, it’s pretty easy to replace a showerhead. Even if your current showerhead “works just fine”, upgrading is a job that can save you money on your energy and water bills. With an upgraded showerhead, you can cut your water use anywhere from 25 to 60% by using less less water, thus using less energy on hot water heating. Maybe it’s time to replace that water-hogging showerhead with a new model. - Source: Internet
- With the gasket in place, screw the bottom of the hand held shower head onto the hose until it is hand tight. Once that is hand-tight, you can place into the holder in the T-valve. The holder itself can be adjusted to get your preferred angle. - Source: Internet
- You obviously need to enter the shower area to get to the shower unit. Therefore, ensure that the shower tray is dry and not slippery. A fall will not only cause damage to the shower unit and cubicle but will also injure you quite badly. - Source: Internet
- When choosing a replacement shower head, there are two main fixing types of shower ideas: an overhead shower head, or a shower handset. The former attaches to a shower arm that comes out of the ceiling or wall above your head, the latter connects to a flexible hose, usually on a riser rail. Aim to replace like-for-like. - Source: Internet
- After you’ve installed the mounting bracket, you’ll attach the shower head hose. You’ll attach the shower hose by screwing the regular nut-type end of the hose onto the mounting bracket clockwise and tightening it by hand. Then you’ll attach your new handheld shower head to the cone-shaped end of the shower hose by screwing it on clockwise until tight. The cone-shaped end of the hose that’s now screwed onto your new handheld shower head handle will slide perfectly into the mounting bracket so you can return your handheld shower head to it’s mounting bracket when it’s not in use or when you want to use it as a mounted shower head. Following these simple and easy handheld shower head installation steps will help you to install your new shower head quickly and effortlessly. - Source: Internet
- Then, turn the hose fitting that’s screwed onto the shower unit anti-clockwise. This might be difficult because of problems with access, how long the hose has been installed, and whether there’s any limescale build-up around the joint. Ideally, you should be able to unscrew this by hand too, but if not, wrap an old rag around the cone and grip it using a pair of pliers. - Source: Internet
- Step 3: once the hose is removed, you will see a small washer at the end of the hose. Check the condition of this washer. If the washer is perished at all, it will mean water will leak from it and must be replaced before fitting a new hose. - Source: Internet
- This bracket also carries water from the pipe to the shower hose. It’s typically plastic, even though it seems like chrome metal in this case. Over tightening a plastic fixture onto a metal pipe can result in cracking and leaking of the fixture. Finger tightening should seal well. No pipe wrenches needed, and are in fact, discouraged on plastic attachments. - Source: Internet
- Furthermore, you might also havreplace your shower headen the shower head and hose — this will need attention just like the joint between the hose and shower unit. Remember, you won’t always need to replace your shower accessories. If you have a relatively new shower head and hose and they just need some mild cleaning, then all you have to do is dismantle and clean. If, however, you see a build-up of limescale or want to upgrade an old shower head, then consider buying a new shower head and hose. They aren’t expensive, and you’ll immediately notice the improved shower experience. - Source: Internet
- Place the black gasket to place in the fastening nut. It should sit right down inside of the nut. Then, take that hose end up to the t-valve and line it up with the open threads on the back of the t-valve. Start twisting the hose nut on to the threads until it is hand tight. - Source: Internet
- New shower heads can help lessen the amount of water you use and save money on your water bill. Learning how to change a shower head is a simple task that only takes a few minutes. This guide explains the steps to installing three different kinds of shower heads: fixed-mount, hand-held, and fixed-mount and hand-held combination models, also known as a dual shower head. - Source: Internet
- Note the debris hanging off the water pipe threads in the next picture. Good idea to clean off any old plumbers tape and putty sealants. This ensures washer seal integrity when you screw on the new shower head holder. - Source: Internet
- This is definitely one of the fastest and easiest DIY home improvement projects I’ve done. I can’t believe it’s taken me this long to get around to it! Even if you’re a renter, you can easily install a handheld shower head and switch back when you move out. Don’t suffer with a mediocre shower head any longer! - Source: Internet
- Out with the old… In with the new! Now you can attach your new showerhead. You probably won’t need tools to screw in the new showerhead, so use your hands to screw the showerhead onto the hose or pipe (clockwise). - Source: Internet
- This articular brand of shower head comes with a lock nut. The lock nut has a single thread on the outside of the nut. That thread needs to be facing out. Twist the lock nut on the shower arm until the end of the threads. - Source: Internet
- Before you wash your hands of this job, check for any leaks that could lead to wasted spray and higher water bills. After the new shower head installation is complete, take a step back and turn the water on for a few moments. If you see any streams of water coming from the wrong parts of the hardware, turn off the water once more so that you can disassemble the head, dry it, and then secure it with more Teflon tape. Then, tightly secure it to the arm and test it again. - Source: Internet
- We needed no tools or supplies, except for when removing the old shower head. For that, we used a Crescent adjustable wrench. Here’s how we did that. - Source: Internet
- Although some may consider this step unnecessary, it is a good way of preventing damage and loss of materials: Lay down your tap. This way you won’t lose anything down the drain and block it. It also means you’re less likely to scratch your bathtub or shower tray in case you drop something. - Source: Internet
- You now know how to change an old shower hose and shower head. Since you’re still here, it’s probably worthwhile thinking about what type of new hose and head you should buy. Many domestic hot water supplies contain foreign particles, pieces of rust, limescale, and all manner of impurities that can damage your bathroom setup and fixtures. If you want an efficient and pleasant showering experience, you should buy a shower head that filters all unnecessary particles out of running water. - Source: Internet
- There should be a rubber washer that fits into one end of the hose for a tight seal. Once that’s in place, screw that end into the lower opening of the mounting bracket (or to the wall itself, in my case). Turn on the shower water to flush the hose of any residue and test for leaks. - Source: Internet
- Below is our Waterpik massaging shower head after installation, and appears to be functioning properly. No leaks found. But don’t rush to conclude that the installation is over just yet. Run the shower through a few paces as follows, to make sure leaks do not show up. - Source: Internet
- Some shower hoses need a specific hose end for the shower head. Then the other end goes on the source pipe. In these cases, they usually label the ends. - Source: Internet
- While we’re talking about this, it’s important to note that the fittings at each end of the shower hose are not interchangeable. One end will only fit the shower head and the other will only fit the shower unit. Be guided by the installation instructions supplied by the manufacturer. They are invaluable! - Source: Internet
- Find the series of linear grooves, also called threads, at the end of the shower arm, and apply two or three passes of Teflon tape over them in a clockwise direction. Press the shower head tape firmly into the threads with your fingers with each wrap-around so that you can start to see them through the tape. This specialty plumbing tape acts as a seal; when you twist on a new shower head, it ensures a snug fit and prevents water flow from leaking where the hardware screws together. - Source: Internet
- I first cleared off the old Teflon tape to prepare the threads for the new Teflon tape. The Teflon tape comes with the shower head kit. This tape helps to keep a tight seal to prevent leaking. - Source: Internet
- Of course, you might decide to replace your showerhead with a newer model that filters limescale, solids, and other impurities from your water supply. If this is the case, you need to remove your old shower head and dispose of it according to local and national waste disposal regulations. When you’re replacing your old shower head, it’s a good idea to replace your old hose as well in order to keep everything uniform and functioning correctly. - Source: Internet
- Before the installation process begins, you will need to uninstall the old shower head. An adjustable crescent wrench is helpful to get the old shower head loosened. Channellock pliers can also be used if no hex nut is found on the old shower head. - Source: Internet
- The steps involved in installing a shower head depend on the type of replacement shower head chosen. While a standard wall-mount shower head may be easy to swap in and out, other types may require more work and professional installation. For each type, here is an overview of how to install a shower head: - Source: Internet
- It may sound obvious but before you begin do make sure the shower is turned off! There’s no need to turn off the water at the mains, just as the shower controls is fine. Next it’s how to take the shower head off. Simply unscrew the old shower head by twisting it anticlockwise at the point where it connects to the shower arm or hose. - Source: Internet
- Before installing a handheld shower head, you’ll first need to remove your old shower head. You can do this by wrapping a washcloth around the top end of the shower arm that’s closest to the wall then clamping your pliers around the washcloth and shower arm to give you a good grip. The washcloth between the shower arm and pliers helps keep the pliers from scratching or damaging your shower arm. Next, you’ll need to wrap another washcloth around where your old shower head is attached to the shower arm. Then clamp over the washcloth and shower head attachment with your adjustable wrench and turn counterclockwise from the shower arm until your old shower head is completely unscrewed and removed. - Source: Internet
- Now to the hardest task in installing a new hand held massaging shower head. This is probably removing the old fixed mount shower head. Especially if it’s at least several years or decades old, or shows signs of metal corrosion. - Source: Internet
- Step 4: leave to soak for around 30 minutes, or overnight depending on how bad the limescale has built up. This step can be repeated after you’ve rinsed the shower head if needed. Please note, if your shower head is made from brass, do not soak for more than 30 minutes. - Source: Internet
- With any home update, there’s an opportunity to refresh a much-used space and make it more appealing and inviting. Upgrading the shower experience can help everyone in a household feel better, too. While updating the shower with a new shower head isn’t a tough DIY project, it’s important to set aside enough time to complete and test the installation so you aren’t without a way to shower. - Source: Internet
- If you have descaled your shower head and its performance has still not been improved, it is likely that the shower head needs replacing. Over time a shower head can become clogged with scale, particularly in hard water areas. Read our tips on how to replace a shower head below: - Source: Internet
- Pfister has debuted a new line of Vie showerheads with Hydrodrench technology, available exclusively at Lowe’s. See those larger nozzles towards the center? They form bigger water droplets in a more concentrated area, making your shower feel warmer and more luxurious. Best of all, even though it feels like there’s more water, you’re actually conserving it instead! - Source: Internet
- If it won’t budge, grab a rag or towel and some tools for assistance. Wrap the rag around the shower arm—the pipe that connects the shower head to the wall—to protect it from damage as you grip onto it with slip-joint pliers. Then, clamp the adjustable wrench around the head’s base and twist it off counterclockwise until it’s removed from the arm. - Source: Internet
- Step 3: once the shower head is removed, you will see a small washer at the end of the hose. Check the condition of this washer. If the washer is perished at all, it will mean water will leak from it and must be replaced before fitting a new shower head. - Source: Internet
- On this Waterpik shower head, we find a large nut at the back of the silver holder. This locks the holder in place once you’ve positioned it. Position and lock the head in the desired spot as follows: - Source: Internet
- Our Waterpik has eight different spray settings. Adjust to each of these, while water fully ON to make sure the settings lever moves easily. Also, different sprays place differing back pressures on the hose and fittings. Particularly for the most constrictive settings, check that no leaking occurs. - Source: Internet
- These suction cup shower head holders work best on smooth surfaces. Locate where you want to place it and simply press it up against the shower surround and flip the lock over. The holder angle is also adjustable. - Source: Internet
- After deciding that a shower head needs to be replaced, the next step in how to change a shower head is figuring out its replacement. While it’s lucky there are so many types available, it can take some time to figure out which kind is right for your shower. More than just finishes and styles, there are adjustable sprays, handhelds, wall mounts, top mounts, and shower panel systems. Plus, there are options with lights, music, temperature controls, and the ability to take phone calls. - Source: Internet
- Well, sometimes the shower hose becomes damaged at the point where it joins the shower, resulting in a water leak. Not only does this reduce pressure at the shower head, resulting in a less enjoyable shower experience, but it also causes an unsightly accumulation of limescale (especially if your area has hard water). And of course, leaks anywhere in the plumbing system waste a lot of water, which means you aren’t getting the benefit of all the water you’re paying for. Plus, it’s generally bad to waste a precious, finite resource like water. - Source: Internet
- Additionally, shower heads that filter and soften water will effectively reduce the amount of chlorine, bacteria, and dirt in running water. The filters in the shower head will also trap and remove mineral build-up and other impurities. You only need to replace the filters every six months and you can easily get the replacement filters from us! - Source: Internet
- Turn on the shower at a low flow rate setting to test the joint. There should be no leaks around either cone. If there are any leaks, tighten the cones a bit more. either by hand or by wrapping a rag around them and using pliers. Don’t tighten too much — the threads are usually made of plastic and may become damaged if you tighten them more than necessary. - Source: Internet
- Note: The locking nut is not always needed when you have short threads on the shower arm. I found this out when I went to test it at the end. I had a small leak near the t-valve. Once I removed the locking nut I didn’t have any leaking. If your shower head leaks too, removing the lock nut might help as well. - Source: Internet
- Give that fixture a good old clean. Even when giving your home a deep clean, you probably don’t clean the shower hose or pipe, meaning that you could be faced with some grime build-up. Give it a good scrub with the toothbrush, or just wipe it down with paper towels if there’s not too much dirt. Make sure you don’t damage the threads of the shower hose! - Source: Internet
- For a quick fix, consider replacing an existing shower head with an energy-efficient, low-flow model. This newer option doesn’t mean low pressure, it just uses less water per minute, which saves resources in the long run. Follow these steps to learn how to change a shower head, and install a new fixed-mount or handheld shower head with ease. - Source: Internet
- ‘Upgrading your shower head is also an excellent opportunity to incorporate some new contemporary features into your bathroom. Such as spa-like spray modes and water saving technology’ says Ashley Smith, of Ideal Standard UK. (opens in new tab) For extra fun, switch up to a shower head with built-in Bluetooth speaker and blast out the show tunes while you wash. - Source: Internet
- Standard wall mount. Usually the least expensive and easiest to install, the wall-mount shower head usually can be attached by hand. Just place the new head on the shower arm and twist it clockwise until it’s securely in place. Be sure to follow any special instructions from the manufacturer. - Source: Internet
- The handheld shower head kit should include a T-Valve. The T-Valve is made to be hand tightened. No need for any tools. It is plastic, so don’t over tighten it or it could break. - Source: Internet
- Today’s sealing washers come with new shower heads. They form strong and resilient water tight seals with the source pipe. They well stop all leakage even when you just hand tighten the fixture. - Source: Internet
Video | How To Change A Shower Head With Hose
To obtain the most accurate information about Hose To Shower Head Adapter, it is essential to investigate the credibility of each source by reading.
This article contains multiple How To Replace Hand Held Shower Head And Hose-related films from a variety of sources, which will expand your understanding about How To Replace A Shower Head Arm. Internet is an excellent resource for getting information on a range of subjects.
## Here are some crucial points concerning How To Replace A Shower Head Arm:- How To Change A Shower Head With Hose
- How To Install A Shower Head With Hose
- How To Replace A Shower Head With Hose
- How To Install New Shower Head With Hose
- How To Replace Hand Held Shower Head And Hose
With so many websites and forums giving How To Replace Hand Held Shower Head And Hose-related information, it is not difficult to locate what you require.
This is a highly unconventional method for obtaining knowledge about Descaling or replacing shower heads, hoses and shower curtains, compared to what most people are accustomed to. It permits a more in-depth examination of the content and application of information regarding Descaling or replacing shower heads, hoses and shower curtains.
 Methods for creating aesthetically pleasing and informative displays of How To Add A Handheld Shower Head To An Existing Shower information. They can be utilized in business and marketing environments to convey messages regarding Replacing Shower Head And Handle. Consequently, we additionally supply photographs regarding Replacing Shower Head And Handle.
This article concludes by providing an overview of How To Install Shower Head Pipe. In addition, how to change a shower head with hose and How to Replace a Handheld Shower Head are discussed to compare your understanding of Shower Hose Attachment For Bathtub Faucet.
