Today’s topic is How To Install Led Light Strips On Ceiling. Obviously, you can find a great deal of How To Install Led Strip Lights On Ceiling Without Crown Molding-related content online. The proliferation of online platforms has streamlined our access to information.
There is a connection between the Led Strip Lights On Ceiling Or Wall and Where to Put LED Lights in Your Room information. more searching has to be done for How To Install Led Strip Lights On Ceiling Tiktok, which will also be related to how to install led light strips on ceiling.

66 Tips for How To Install Led Light Strips On Ceiling | installing led light strips on ceiling
- LED light strips also look great when installed under cabinets as task lighting. Although you should try to place your strip lights behind a lip, most cabinets are deep enough to place the tape quite far back. Again, this will ensure you get the full lighting effect, without having to see the light strip and wiring. - Source: Internet
- LED strips are an increasingly popular type of lighting. We often wonder whether it is complicated. We want to show you that it is not as difficult and time-consuming as one might think. - Source: Internet
- The LED strip lights are also lightweight. This allows you to stick the LED light strip to any surface without worrying about it falling off eventually. You can install LED light strips behind a TV, under the cavity of drop-down ceilings, or below the furniture placed over the kitchen table in your kitchen. - Source: Internet
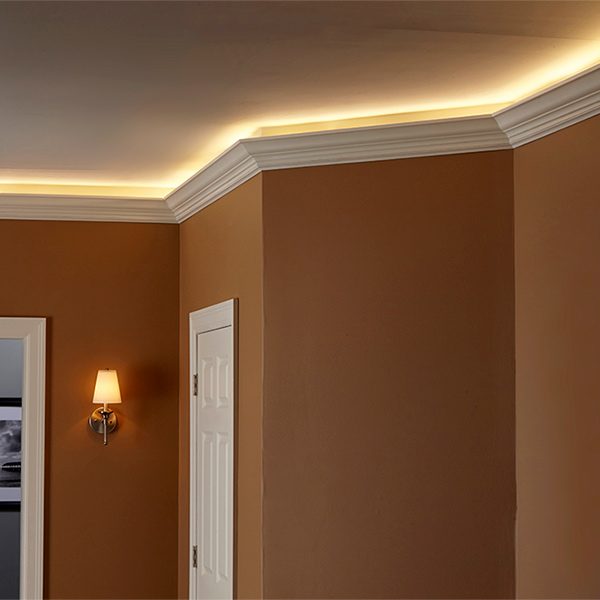
- LED strip lights can look great on your ceiling or walls as a stylish feature, creative task lighting, or to highlight the architecture of drop-down ceilings or coving. To install your LED strip lights on a ceiling or wall, you’ll need to make sure they’re installed behind a lip, such as the edge of a drop-down ceiling or at the top of moulded coving. This will hide the LED tape but still give you the full lighting effect for a much sleeker look. - Source: Internet
- Most LED strip lights are sold on 5m reels (nd require some basic wiring. To install mains-powered LED strips, you will need your reel of LED tape, a compatible driver, and a compatible LED connector wire. Alternatively, our LED strip light kits come with everything you need to get started. Then, follow these steps to connect your LED strip lights to your power supply. - Source: Internet
- Once you have the power supply and controller sorted, you just need wires or solderless connectors to join the strips. LED wires require a little soldering but are a good way to connect your LED strips. However, if you can use solderless connectors it’ll make it even easier. See the How to Connect LED Strip Lights Together section below for more information on how to use these. - Source: Internet
- Under-cabinet lighting adds a subtle glow that helps you avoid stubbing your toe on your way to the bathroom in the middle of the night. It also lets you grab that last glass of water before getting settled in without turning on your blaring overhead lights. You can choose from a soft yellow hue, a deep red glow, a glistening purple, or – with the right light – quite literally any color you want. - Source: Internet
- Connecting different LED strips help you to install the LED lights in difficult angles and corners. The best advantage of connecting different LED strips is the 90 degree turns which is most commonly needed when installing LED light strips on walls or ceilings. If you wish to couple multiple LED light strips together, here’s how to do it: - Source: Internet
- Repeat the process on the other side with the other light strip segment. Double-check to ensure all poles are aligned with their corresponding partners. Mixing up the poles and attaching them to the wrong polarity could damage your light strips. Also, if you are using commercial outdoor LED light strips then make sure you get the corresponding connectors for them. - Source: Internet
- No matter what type of LED light strip you need, a common goal is to find a high-quality product. To make the search easier, we tested a variety of LED light strips, and based on our testing, we chose the following options as some of the best available based on the above buying factors, price, effectiveness, and reputation. Organized by type, one of these may be what you need to light up your home. - Source: Internet
- Check the size of the led tape lights carefully before purchase. You will need to make sure that the length of the led strip lights is not too short or too long for your ceiling structure. - Source: Internet
- Two-way adhesive tape on the back of an LED strip allows for easy installation on most smooth surfaces. The only limiting factor is the length: For 12V systems, the strip should not exceed eight metres, for a 24V system, twelve metres is the maximum length. For longer strips you must use a repeater. Pre-wired models are plug-and-go solutions which can be connected quickly. - Source: Internet
- Top Tip: Install LED strips before hanging any cabinets when using them to light the inside of a cabinet. If you are installing under cabinet lighting, this can happen after the cabinet has been hung. The possibilities are endless. Once you or the designer has decided where the lighting will be placed, purchase accordingly. - Source: Internet
- LED strip lights are right now one of the most popular and alluring parts of decorations for most occasions. As LED strips are available in different sizes, colors, and lengths, it is easy to get your hands on the perfect types of the LED strips for your requirement. Also, LED strip lights to create a great lighting and illumination effect if the light is reflected from a flat surface which makes it a perfect choice for decorative application. - Source: Internet
- Light strips are available in a variety of lengths, typically from 1 to 32 feet. The brightness and intended purpose usually correlate to their length. For example, LED light strips intended for television backlighting or use on stairs tend to be shorter for easier installation. - Source: Internet
- Install the Crown Measure and cut the crown molding using the surface of the 1x2 as the reference point. Cut it upside down and install it so the thick edge is against the 1x2. If possible use a pneumatic nail gun with 2 or 2 ½in. nails to attach the crown to the board. Otherwise, use a hammer and nail-sink to bury the nail heads below the surface so they can be filled with putty later. - Source: Internet
- Adding LED lights to any space in your home, whether for creative purposes or so you can get to the bathroom okay at night, is always a plus. It’s even better when your LED lights are compact, colorful strips you can easily add anywhere for an astonishing glow. On that front, the BlissGlow checks every box. - Source: Internet
- If you choose to purchase your own parts, just make sure the controller can handle the power demand of the strips you’re connecting. To calculate this simply check the specifications of the product. It should tell you the voltage of the strip and wattage per meter (3.28ft). Calculate the total amount of wattage of all your strips and get a controller that has a capacity of 15-20% higher than the highest demand you’ll require. - Source: Internet
- How long do you need your lights to be? LED strip lights are available in a variety of lengths, from short strips that are perfect for small spaces to long strips that can light up an entire room. Adhesive backing: Many LED strip lights come with an adhesive backing that makes it easy to install LED strip lighting. However, some lights will require special mounting hardware. - Source: Internet
- Handling LED strip lights are very easy and it can be performed without needing any professional help. Today, we will be going through the complete procedure of installing new LED strip lights. We will also include some additional information like splitting a single LED strip, Merging multiple LED strips, and using an RGB controller for the LED lights to make it a helpful guide for everyone. - Source: Internet
- One of the most used LED light strips is RGB that allows many different color options for the light output. Along with different colors, RGB LED light strips also come with a dedicated RGB controller that has predefined modes for the lighting effect. These modes are suitable for special occasions where you want to introduce additional effects in the lighting area. - Source: Internet
- A string of small lights, like the rope lights pictured here can be placed behind a strip of crown molding to add instant warmth to any room. The lights in this project are plugged into an electrical receptacle located behind the crown molding. The power to the receptacle is drawn from the source at the room’s light switch and is controlled by a new switch added in the same location. If no wall switch exists in the room where you are adding this lighting, go here for help finding an electrical source and adding the wiring required for this project. - Source: Internet
- The color of a light strip is critical to keep in mind. Some light strips come in only one color, while others can have color selections that range in the millions. The color option that you choose is entirely dependent on your personal preference. - Source: Internet
- LED strips typically have an adhesive backing for easy installation and can easily be cut to various lengths from their five metre reels. When choosing the light strips that you wish to install, it’s important to consider the width of the tape compared to the width of the area you want to install it on. You’ll also need to look at the number of LEDs per metre, as this determines whether the light is evenly dispersed. Although tapes with a higher number of LEDs per metre are slightly more expensive, they do not produce any unwanted spotting effects. - Source: Internet
- Multicolour RGB LED strips are mainly used for decoration. It is a very good solution for watching TV at night, creating an atmosphere to relax or giving your interior a cosy feel. However, more often we still need a fixture providing main light. We connect it to the electrical installation, paying attention to cord insulation colours: blue means neutral cord (N), yellow-green means protective cord (PE). Other ones - usually brown, black or grey - are phase cords (L). - Source: Internet
- Once you know the length, correlate it with the LED strip’s entire run. The higher voltage strips have a higher maximum run. Therefore, you’ll likely need more strips than the maximum run will allow. When it comes to this, you can simply connect the extra strip to the original power plug. - Source: Internet
- The LED strips are available in longer segments (5 meters minimum). They can be cut in marked spots (every few centimetres) in order to fit them to the area which we want to illuminate. The LED strip ends with a bundle of power cords - each RGB strip has four of them. We connect them to the controller, paying attention to their colours and corresponding port markings: R- red, G - green, B - blue, V+ - black. - Source: Internet
- LED light strips with lower brightness requirements, such as a 540-LM strip, will also have reduced wattage requirements. As brightness demands increase, power demands also rise, with a 16.4-foot, standard-density light strip requiring 27 watts of power and a 16.4-foot, high-density LED light strip requiring 40 watts. - Source: Internet
- We tested each of the light strips on this list to see how they performed. Each one was selected based on quality, functionality, and attractive design. In addition to evaluating how well the light strips worked, we looked at the strength of adhesives, app functionality, brightness, and installation ease. Keep reading to see which lights shone above the rest and find out some of the best LED light brands. - Source: Internet
- A single power adaptor is capable of powering two or more LED light strips simultaneously. But to be able to connect multiple LED strip lights to a single adapter, you will need a two-way power splitter first. Once you get your hands on a decent power splitter, make sure that the light strip wattage does not exceed the total output capacity of the adapter itself. Once you have confirmed the compatibility of the adapter and splitter, simply connect the LED strips to the splitter. Connect the single end of the splitter to the power adaptor directly that can be plugged into the AC wall socket. - Source: Internet
- However, as the power of an LED light strip increases, the flexibility decreases, with some light strips being completely rigid in design. These inflexible products tend to be much shorter, sometimes only 1 foot long, and significantly brighter than the average light strip. They can also feature motion-sensing technology, making them ideal for lighting stairs. - Source: Internet
- LED Strip Lights installed behind your computer and TV screen are very affordable. They add beauty as well as visual help to your screens. It is suitable for your eyes to light up such devices that you might use in complete darkness. - Source: Internet
- LED strips may be cut using scissors. Many manufacturers mark locations suitable for cutting on the surface with a scissors symbol or three dotted lines. To connect two separate LED strips, you may use quick-connectors such as the Slimconnect system from Osram. Just make sure that the strips share the same polarity. - Source: Internet
- If you’re using colour changing LED tape, then you’ll need to connect your light strips to a wireless controller using a receiver. This should be connected between the LED tape and the driver. If you want to control more than one light strip with your controller, you’ll need to add multiple receivers. - Source: Internet
- Install led strip lights on the tops of a sturdy surface, such as a steel bar or wooden board. Metal clamps are always highly recommended to secure the led tape lights onto behind bars or boards. - Source: Internet
- Bring wonders of lighting with these LED strip lights. These well-connected strips are what you need for a calm and fantastic night. They can switch up your mood by changing color and patterns. You can use them for a fun and crazy party night or a calm and romantic candle night dinner. - Source: Internet
- Low-brightness LED light strips can be up to 32 feet long with about 300 LED lights. High- brightness LED light strips may have the same number of LED modules, but they’ll usually only be about 16 feet long. However, most flexible LED strip lights can be cut using scissors to accommodate small areas. If longer LED tape is needed, pieces can often be connected to customize to the desired length. - Source: Internet
- The number of pads will depend on the strip. For single color strip lights, you’ll see two electrical polarity marks + (positive) and - (negative). For adjustable strip lights (like RGB and RGBW) the marks are usually a positive mark + and color marks. The color marks are negative polarities and labeled by their color: B (Blue), R (Red), G (Green), and W (White). - Source: Internet
- Connecting the strip lights to the power supply is a fairly simple procedure. If you are using single color LED strips and don’t need a controller then just connect the positive + and negative - ends of your light strip to the corresponding poles on the adapter. Do not mix these up as this will damage your lights. - Source: Internet
- LED strip lights have revolutionised the way we light up our homes and office spaces, thanks to their versatility and many benefits. Whether you’re looking to add ambient lighting to your kitchen or commercial space, or you need some task lighting for your office, LED strip lights allow you to transform any space with a stylish and cost-effective lighting solution. Plus, because no previous electrical knowledge is required to install LED tape, it couldn’t be easier to create the effect you desire. - Source: Internet
- The length of the cords connecting the power supply to the 230V electric installation is not determined, but the cords connecting the strips to the power supply (in this case, one power supply is for two strips) should be as short as possible, due to voltage drop. Therefore, it is best to place the power supply on a shelf made of gypsum-cardboard plates. If it is too narrow, we can hide it in the build-in, in the inspection hole. We should remember, however, that we must be able to access the power supply easily, in case of a malfunction. - Source: Internet
- Standard-density (SD) light strips produce an average of 540 LM and need 27 watts of power. They can be up to 32.8 feet long. High-density (HD) light strips provide an average of 1,080 LM and need 40 watts of power and come in a maximum length of 16.4 feet. - Source: Internet
- Are you looking to add a soft glow to your home that’s perfect for a little late-night reading? Then add LED lights to the big bookshelf in your room. You’ll accessorize your bookshelf and add a little ambiance to the whole space. For example, try adding LED strips directly onto your bookshelf to highlight your impressive collection and get some reading light too. This way, you can read late at night without that bright, irritating ceiling light shining over your head. - Source: Internet
- Brightness can be challenging to figure out, and some manufacturers don’t include this information. By taking note of the LED density, the average brightness of the light strip can be found. Average light strips come in two densities: standard density (SD) of 30 LEDs per meter (9.1 LEDs/foot) or high density (HD) of 60 LEDs per meter (18.3 LEDs/foot). - Source: Internet
- Wattage is a measure of how much energy the light strip requires to function at its optimal brightness. If a light strip requires more energy than the power source is capable of providing, it won’t work correctly, often producing a much weaker light. LED light strips operate using batteries, using power adapters plugged into wall outlets, or being hardwired directly into the home’s electrical system. - Source: Internet
- To perfect your skincare routine or nail your next TikTok makeup tutorial, you’ll need a bright vanity light. Enter LED light strips that transition your room into a full-on salon. With remote controls at your makeup station, you can change your video’s brightness, effects, and color without leaving the frame. And off video, you can set the scene for your morning scrub, evening mask ritual, or however you transform your face. - Source: Internet
- As you can see, the corner portion does not stick to the surface. It sort of floats there. Since this is just a short section, it doesn’t affect the installation integrity or have any significant impact on the uniformity of the light output. That’s all there is to it. I used this technique in my LED lighting strips installation to turn all my corners without the need of any additional accessories or added hassle and I am very pleased with the finished results. - Source: Internet
- It’s essential to determine where the LED light strip will be installed before deciding which product to use. Some designs meet specific purposes, such as stair lighting or television backlighting. Because of this specialization, they are different from the average LED light strip. For example, a product intended for backlighting a TV may come with four precut pieces and television-specific syncing options that change color to mimic the colors on the screen. - Source: Internet
- Do it yourself - installation of LED strips LED strips are an increasingly popular type of lighting. We often wonder whether it is complicated. We… - Source: Internet
- LED strip lights surely look very attractive and alluring once it is properly installed. But, you have to follow a somewhat tedious procedure to install the LED light strips correctly. The process is a bit more complicated if you have opted for RGB LED strips instead of a single color option. Fortunately, there are many additional components available that will save you the trouble of manual work while installing these LED lights. - Source: Internet
- It is a good idea to use a multicolour (RGB) strip on the ceiling. A controller will also be required to make it possible to change the colour of the light, its intensity and other functions - depending on the strip which chosen by us. A remotely-controlled controller is the most convenient to install. We connect it using two cords with a power supply changing the alternating current from 230V installation to direct current of low voltage, which is needed to power the strips. We should pay attention to the + and – markings (if we get them wrong, the strip will not work). - Source: Internet
- As you’re laying down your LED light strip, you’ll arrive at natural stopping points. These could appear when you’re going around corners in a room or want to end a segment of lights. Cutting these strips can be really easy, all you need is a pair of scissors. - Source: Internet
- If you’re someone who likes to read or binge your favorite TV show late into the night, try adding an LED light strip under your cabinets. You can apply your LED strips to cabinets above your kitchen countertop or along the toe kicks below your under-sink cabinets. In both cases, you make it easier to navigate your home in the dark. - Source: Internet
- Find the cutting lines along the strip. These have copper pads that run along it. Copper pads work as connection points between strips. Cut right down the middle of the copper pads so you have the same amount of copper pad on either side of the cut. - Source: Internet
- RGB LED strips have a higher number of terminals as compared to regular strips and they are indicated by the symbols “+”, “G”, “R”, and “B”. You will find similar terminals on the RGB controller included with the RGB LED light strip. To connect the controller with the strip, you need to simply connect the identical terminals of the RGB connector and LED strip. Then, we need to connect the RGB connector directly with the power supply with the help of power cables or a DC connector. If your RGB controller has a 4 pin connector pre-installed on the device, you need to simply insert the connector in the strip, and you are done. - Source: Internet
- LED strip lights are adjustable to every size through proper cutting after making measurements. Hence, they can be installed under and over various pieces of furniture. These bright lights would look as if they are high-cost custom-made. - Source: Internet
- You may also wish to consider adding a heat sink onto the back of the led tape lights for more thermal dissipation. Especially if you have chosen one with a low amperage rating or high lumen output. - Source: Internet
- Generally, 12V light strips will work for up to 16.4ft (5m) while 24V light strips can run up to 32.8ft (10m) in length. You don’t want to connect more light strip segments to a single power source. Doing so could cause the lights at the end to become weaker or even get damaged due to Voltage Drop and Electric Power Overload. - Source: Internet
- If you want to install a longer series of lights, you need to install additional electricity feed points. This can be done quite simply. You can either purchase several strips and plug them in at different sockets or install additional energy feeds at points where you’ve cut the strip, like the corners. - Source: Internet
- In most cases, you will need a long strip of LED lights to cover a larger area. If you want to cover the periphery of a wall or a large desk, you might not find a single strip of LED that is long enough to cover it properly. In such situations, you will have to connect multiple LED strips. If you wish to connect them to a single power source, here’s how to do it. - Source: Internet
- Light strips were installed in a kitchen or onto a TV, based on the design. Manufacturer installation and operation instructions were followed. Testing took place over a 2½-week period to give us a more accurate view of the light strips’ functionality and adhesive strength. We connected the lights to their accompanying apps and tested the features to find out not only their usefulness but also their functionality in everyday life. - Source: Internet
- Backlighting the ceiling with LED strips is a popular way to create striking decorative lighting. We should think about it already at the stage of renovation or make changes in our homes so that we can prepare an adequate structure for a suspended ceiling. We should also give some thought to what we want it to look like and what effect we want to achieve. It is a good idea to stick LED strips on shelves making them appear invisible. As a result, we get discreet lighting that can create a nice mood in the evening, or complement the main lighting in an interesting way. - Source: Internet
- Install the 1x2 If necessary, cut a notch in the 1x2 board to allow for the outlet box before attaching it to the wall. Hold the board up and drill a pilot hole over each stud using a countersink bit so the screw heads will sink below the wood surface when it’s installed. Set the bottom edge of the 1x2 on the straight lines you drew with the measuring stick and set a level on top to be sure it’s straight before driving 2½ inch screws to secure it to the framing. If your walls are very thick, you may need to use 3 inch screws to attach this backer board. - Source: Internet
- If you’d like an easy-to-install option, consider brands like Govee. Govee has been “Making Life Smarter” since November 2017. They create cutting-edge LED lights and smart home devices with a customer-obsessed mindset. Committed to unparalleled R&D, they are a leader in the strip light industry. - Source: Internet
- For the brackets, prepare for drilling by measuring and marking where you want the holes to go. Then drill the holes, position the brackets, and place the strip in place. Brackets will hold the strip firmly and is preferable for outdoor areas, as poor weather conditions could rip the strips away from their glue. - Source: Internet
- LED light strips are designed in such a way that you can connect them together to create a singular lighting strip according to your requirements. But, if you wish to connect multiple LED light strips together, you must connect them in series. This way, You can make sure that the LED light strips are protected from sudden voltage surges as well as voltage drop. - Source: Internet
 Following are some suggestions on where to begin your search for data on Led Strip Lighting Tips:
You should try to find Led Strip Lighting Tips-related information from reputable places. Libraries, online resources, and even paid journalists all fall under this category.
Following are some suggestions on where to begin your search for data on Led Strip Lighting Tips:
You should try to find Led Strip Lighting Tips-related information from reputable places. Libraries, online resources, and even paid journalists all fall under this category.It’s crucial to be aware of the many electronic media sources available when researching Led Strip Installation Tips, such as Google and YouTube. You may also get info about How To Stick Led Strip Lights On Wall on social media sites like Facebook and Twitter.
Video | How To Install Led Light Strips On Ceiling
It’s crucial to read to examine the authenticity of each source in order to acquire the greatest information regarding How To Install Led Strip Lights On Ceiling Corners. You’ll learn more about The Best LED Light Strips of 2022 after watching the films included in this post, which come from a variety of different sources. Information on a wide range of topics may be easily accessed via the internet.
## Notable features of DIY Crown Molding Lighting include:- How To Install Led Light Strips On Ceiling
- How To Install Led Lights Strip On Ceiling
- How To Install Led Strip Lights On Ceiling Without Crown Molding
- How To Put Led Strip Lights On Ceiling
- How To Install Rgb Led Strip Lights On Ceiling

Because there are so many websites and forums that provide information about how to install led strip lights on ceiling without crown molding, it should not be difficult for you to locate the data that you want.
The majority of individuals are accustomed to taking a completely different approach when it comes to obtaining information regarding Led Strip Lighting Tips. This makes it possible to take a more in-depth look at the information that is available about Led Strip Lights On Ceiling Or Wall and how it might be utilized.
methods for producing information displays about how to install led strip lights on ceiling with crown molding that are both aesthetically pleasing and functional. In commercial and marketing settings, as well as for the purpose of conveying information on Led Strip Lights On Ceiling Or Wall, they are useful tools to have. Because of this, we also supply some photographs relating to installing led light strips on ceiling.
In summing up, I’d like to say that this article offers a general summary of How to Install Led Strip Lights. Also covered are Diy Led Ceiling Light and How To Install Led Strip Lights On Ceiling Tiktok, which serve as a benchmark for evaluating the depth of your understanding of how to install led strip lights on ceiling with crown molding.
