This time around, we shall cover How To Attach An Undermount Sink. Obviously, there is a great deal of information on How To Install Undermount Sink To Silestone on the Internet. The rapid rise of social media facilitates our ability to acquire knowledge.
information about Reattach an Undermount Kitchen Sink is also related to how to fit an undermount sink and undermount sink with granite?. As for further searchable items pertaining to Best Sink For Quartz Countertop, they will likewise have anything to do with How To Install Undermount Sink To Quartz.

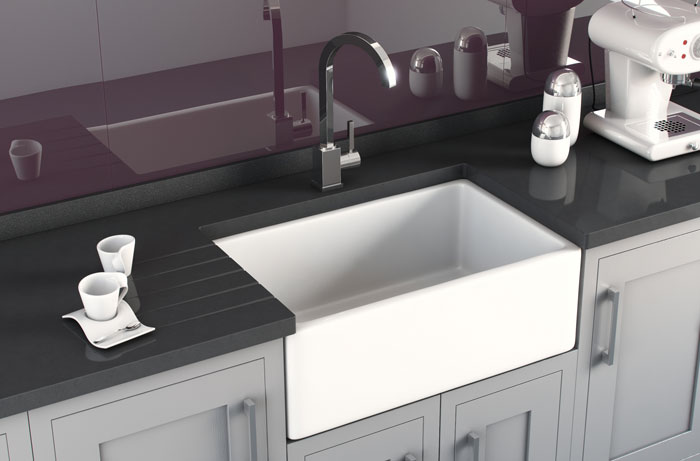
85 Tips to How To Attach An Undermount Sink | How To Install Undermount Sink To Wood
- Some installers prefer to mount the sink working with the countertop right-side up. Doing so gives you a better view of the fit and look of the reveals during the final stages as the sink clips are tightened to retain the sink rim on the underside of the counter. It’s also what you have to do if you’re trying to re-install an existing undermount sink that’s delaminated and falling away from the countertop. - Source: Internet
- A botched installation can ruin even the highest quality countertop. Today let’s take a look at how to install an undermount kitchen sink with a focus on properly supporting the weight of the sink. Small bathroom or bar sinks are easier – they typically can be mounted directly to the concrete using the hardware provided with the sink. Kitchen sinks are too heavy to mount directly to the concrete, so special preparations must be made. - Source: Internet
- To support the sink during installation while the epoxy dries, place a two-by-four across the countertop over the sink opening, using towels under the board on either end to protect your countertop. Place the end of a bar clamp through the sink’s drain hole. Put a smaller board underneath the sink to protect it. Tighten the clamp onto the boards to hold the sink securely in place while the epoxy dries. - Source: Internet
- Step 4: Install the undermount sink in place. You need to use the bar clamp to hold and tighten it in place. You can wipe off any excess silicone both inside and outside with a cloth. - Source: Internet
- To hold and suspend the sink before drying off silicone, you will need to use the bar clamp. First, apply the silicone onto the quartz countertop. Use the bar clamp to suspend the sink in place and wipe off any excess silicone. - Source: Internet
- Professional installation is often recommended for a precise finish. If you do decide to try your hand at it, have a helper handy. Here are the steps for installing an undermount sink: - Source: Internet
- Most undermount sinks come with clips to attach them to the underside of your countertop. However, you don’t have to use clips for all undermount kitchen or bathroom sink installations. You can also use brackets or the two-part epoxy. You can also use a combination of attachment methods for a more secure hold. - Source: Internet
- If you’ve decided to break away from the traditional sink install, and instead are opting for an undermount sink, there are some key things to know beforehand. First off, providing your countertop fabricator with factory specs of your new sink will be crucial. After all, you shouldn’t be cutting the hole for your sink yourself, especially if you’ve decided to install natural stone countertops. - Source: Internet
- Generally, however, marble is much more durable and flexible than other metamorphic stones, a category of rocks to which it belongs. Marble countertops weather very well under all conditions, and they last for generations without visible damage. While you can scratch it with most pointed instruments, it will take a lot of force to actually damage the integrity of the slab. Marble countertops can handle any load that an undermount sink can put on them. - Source: Internet
- The first type of support is a commercial sink bracket sold by granite supply companies. These brackets are designed to be installed onto the cabinet frame. Follow the manufacturer’s instructions. - Source: Internet
- Undermount sinks work best with solid granite, marble, or concrete counters. This sink style is more likely to pull away from laminate and tile countertops. If your undermount sink starts to detach from the counter, here’s who you can call to get repairs made. - Source: Internet
- A countertop specialist can assess the situation and determine the best support system for your saggy sink. For example, an undermount sink shouldn’t be attached to countertops less than three-fourths of an inch thick with screws. Drilling metal brackets into thinner countertops could cause cracks. - Source: Internet
- Comparatively, undermount sinks require less countertop space than their drop-in countertops. As such, if your kitchen counter or bathroom vanity is short on space, the undermount sink can afford you slightly more surface area. It also allows you to draw more attention to your countertop material. - Source: Internet
- Recently, though, another debate has taken over the kitchen space: undermount vs. drop-in sinks. Some homeowners swear by the undermount sinks, while others would rather stick with the more conventional drop-in sinks. All in all, it’s a debate that’s worth the while. - Source: Internet
- The second type of support is a custom made wood frame that mounts to the cabinet walls. The frame supports the sink by its flanges. Always leave some wiggle room between the sink bowl and the cradle so that you can align the sink with the countertop hole. - Source: Internet
- An undermount sink typically pairs up with solid surface countertops (quartz, granite, etc.), and if you have a drop-in sink, most likely you have a tile or laminate countertop. In short, you cannot have either of those materials with an undermount sink since the edges of the material that supports the countertop will be exposed. - Source: Internet
- Sleek undermount sinks give the kitchen a seamless look and make it easy to sweep crumbs off the counter instead of trying to launch them up and over the sink’s lip. Undermount sinks are attached to the counter from underneath instead of being dropped into a hole on the counter and secured to the countertop with a lip. A common issue with the undermount design is that they can be prone to sagging over time. When the sink starts pulling away from the countertop, leaving a gap, it needs to be hiked back up and secured in place. - Source: Internet
- Undermount sink installation requires you to attach the sink directly to the countertop. You can do this before or after you install the countertop. To do it before, flip over the countertop to make the attachment process easier. Leave the countertop upside down until the epoxy fully dries. Then, carefully flip over the countertop with the sink attached to install it. - Source: Internet
- Step 4: You may have up to 10 undermount sink clips in the pack. You can use between 4 to 6. As a recommendation, place one clip at the four outer edges and two clips at the center. - Source: Internet
- Top-mounted sinks take up valuable counter space that’s freed by an undermount sink. Because they are often deeper, they provide more sound dampening. It’s the ideal choice if you’re considering a more modern look that enhances clean and straight lines with a minimalistic appeal. - Source: Internet
- Marble and granite countertops have always been popular choices for kitchen countertops, but it was primarily for their looks. In this case, they are ideal for undermount sinks because they also happen to be durable. The fact that they are porous also helps in helping the adhesives bind more firmly with the stones. - Source: Internet
- After you complete the undermount kitchen sink installation, it’s crucial to check if everything is adjusted and works as it should. Carefully examine everything, then pull and push the sink slightly to ensure that both the alignment and sealing are done correctly. Don’t forget to turn on the water to make sure that there is no leakage and that the water drains out properly. - Source: Internet
- We sell sinks as well as granite counters. When you come in to our Austin granite shop off North Lamar, we can show you a catalog of popular sink styles. You can also bring in one from somewhere else to go with your new countertops. - Source: Internet
- There is an existing composite sink, and the installation has failed, leaving a gap between the counter and the undermount sink. I would like to replace the sink with stainless, also the faucet and possibly the disposer. Not sure why the existing install has failed, so I feel I will need an extra-competent installer. - Source: Internet
- If you need help you can call Granite Selections to assist you in installing your undermount sink. To learn more about us give a call at (888) 906 3317. We’ll be happy to help you! - Source: Internet
- It’s essentially the same process as installing an undermount kitchen sink. The only variation is that the sink may be smaller and thicker. Undermount sink clips are often manufactured to adjust to different thicknesses. Fasten them until they grip the sink’s edge adequately. Silicone caulk will bind a ceramic sink to a quartz countertop base with no issues. - Source: Internet
- As with any DIY projects, it becomes a lot easier if you know what you’re doing. This means you have to read and research before you start installing your undermount sink to avoid big problems. Always be sure to read your instruction manual that comes with the sink and don’t be afraid to ask a friend to help you with the heavy lifting. - Source: Internet
- The second benefit is that undermount sinks are deeper than any other model types. The average topmount sink is approximately 5 inches deep compared to an undermount sink which is about 10 inches deep. This gives you more room for washing food and dishes in your sink. With that amount of room, you can even wash your small dog there if you want. So undermount sinks and granite countertops do belong together. - Source: Internet
- Position the under-mount sink on the floor of the cabinet below the cutout for the sink. Typical under-mount sinks do not have predrilled holes for faucets, so either long edge of the rims for kitchen sinks can install along the front or back edge of the cutout. For vanity sinks, position the sink so the overflow port at the upper portion of the bowl is toward the front edge of the countertop. Note the channels below the rim of the sink where the under-mount clips install. - Source: Internet
- Countertop specialists will ensure your undermount sink is installed correctly. They’ll use a metal or wood brace if needed, then attach the sink with epoxy adhesive. Finally, they’ll use silicone caulking to seal it up tight. - Source: Internet
- As for the undermount sink, cleaning is way easier as there’s no rim between the countertop and the rim. All you need to do is wipe the food crumbs down the sink. You also don’t need to worry about gunk buildup along the sink rim. - Source: Internet
- Another problem area is the gap between the sink and the granite. Even with a zero reveal, which means that the sink is attached to the sink as closely as possible, there is still a little bit of a gap that you have to caulk with silicone. This silicon caulk has the potential to build up food or grime over time. You have to take time every other week to clean this to avoid any germs from building up there. - Source: Internet
- Step 7: The next step is to apply the silicone caulk on the rim where the sink will sit. You only need one strip. Ensure that it’s a uniform amount all around. - Source: Internet
- About the author: From his past experience as a contractor and cabinetmaker, Michael Chotiner has accumulated some great “pro how-to” knowledge that he likes to share for The Home Depot. To see a wide array of under-mount and over-mount kitchen sinks, visit homedepot.com. - Source: Internet
- While positive and negative reveals are options, the only option you should go for is the flush mount reveal in which the edge of the sink is aligned with the edge of counter cutout. The reason why is obvious: a positive reveal will create more areas that will need cleaning while the negative reveal will guarantee you chip part of your countertop pulling a pan out of the sink. A flushmount or neutral reveal will make life and cleaning a lot easier. - Source: Internet
- When you have a negative reveal, a portion of the countertop underside is exposed to splashing water. This is a problem with granite countertops since granite is a porous material which means that water can seep through it and the sink area has a large chance of becoming a breeding ground for mold. To avoid this, make sure that your granite countertop is sealed on all sides. - Source: Internet
- Undermount sinks are attached directly to the underside of the countertop. They work best with solid-surface countertops, such as granite or marble, because they need the strength for support. They can be attached with various methods, including a two-part epoxy, clips and brackets. If you use brackets, they have to be screwed into the countertop, which can cause cracking if you don’t do the job correctly. - Source: Internet
- How thick your countertop or sink is. Some faucets will only fit a certain deck (countertop or sink) thickness, so definitely check that before ordering. However, keep in mind that many faucet brands will carry adapters for thicker counters. - Source: Internet
- With the undermount sink in place, mark the potions where the holes need to be drilled on the countertop. Take the sink out, and use a drill to put holes in the marked spots. Then clean the ridge with denatured alcohol and allow it to dry. - Source: Internet
- Also known as the rimmed or top-mount sink, the drop-in sink is perhaps the more popular of the two. From its name, you can easily guess that this sink drops into an opening on the counter. It also has a noticeable rim or ledge with a width varying from 0.5 inches to 2 inches surrounding the sink. This rim sits on top of the counter and helps hold the sink in place. - Source: Internet
- The best thing about undermount sinks is that they can be used with any type of stone countertop. Whether you have a marble countertop, a quartz countertop or a granite countertop, undermount sinks can be installed without any problems. Wondering how to install drop-in sink on granite countertop? Look through the guide below. - Source: Internet
- Be sure to ask if the specialist will reattach the plumbing after setting the sink. Some don’t, which means you might need to enlist a professional plumber as well. Installing a sink shouldn’t take more than an hour or two, assuming the countertop specialist doesn’t run into any problems. The average cost to have this sink repair made is around $200. - Source: Internet
- Slip the clip brackets onto the mounting studs and over the sink rim. Tighten the wingnuts finger-tight. Over-tightening risks cracking the countertop. - Source: Internet
- Undermount sinks look good with granite countertops. It adds a modern look to your bathroom or kitchen while simplifying countertop cleanup. Before we discuss the details of installing your undermount sink on a granite countertop, let’s first go through the general ideas of the project. - Source: Internet
- Be careful not to bend the sink. And you need clearance from the basin. I’ve done it; it takes some patience. Sand it smooth to avoid injury, but it doesn’t have to be pretty as it goes under the counter. - Source: Internet
- There are two ways to install a sink with a quartz countertop. The conventional way is to mount it with its edge sitting on top of the countertop surface. This is referred to as an overmount sink. The alternative is to install a sink below the countertop, known as an undermount sink. - Source: Internet
- You can see that the opening must be perfectly cut for the size and shape of the sink. Also, the edge is polished, just like the top of the counter. The edge is called a flat-polish edge and is the same regardless of the style of edge profile you pick for the other edges on your countertops. - Source: Internet
- Installing a sink is no small task, so you may want to hire a plumber to ensure it’s connected properly and leak-free. Plumbers charge between $45 and $200 per hour on average. Installing a sink only takes about an hour. - Source: Internet
- Since 3cm granite (the typical thickness found in Austin) is about 1 and 3/16-inches thick, this makes the undermount sink seem a little deeper than it actually is. The sink is as deep as the depth of the sink PLUS the depth of the granite. So a 9-inch deep sink woud be over 10-inches deep once it is installed. - Source: Internet
- I absolutely love the bright, white Elkay sink with the quartz finish. Logan and I actually disagreed about the sink color. He wanted a black sink and I disagreed. - Source: Internet
- In addition to clamps, rails, or brackets – undermount sinks should be glued when installed to the underside of countertops. This is usually done with a 2-part epoxy or 100% silicone. This is what we used. - Source: Internet
- It really comes down to personal preference and budget. As mentioned earlier, overmount sinks are generally easier to install and less expensive. However, many prefer the clean look of the undermount sink (myself included). - Source: Internet
- An undermount sink is installed beneath the granite countertop, usually by glueing the lips of the sink basin to the bottom of the countertop and otherwise strapping or supporting it. A drop-in sink, conversely, is set down into the countertop with its rim over the edge of the granite. With both, you need to be careful to prevent moisture or grime build-up inside the seam. Each style has its own unique advantages, which you should consider when choosing a style. - Source: Internet
- The drop-in sink has a rather traditional, timeless look. This means it can fit right into any countertop, no matter the kitchen style. For example, if you have a classic-style kitchen, you can get porcelain or enamel cast iron drop-in sink to complement the overall look. - Source: Internet
- As for sink material, the industry standard for an undermount sink is stainless steel, made popular because of its low price point and because it’s easy to clean, sterilize, or polish. Stainless steel is also widely available in a dual-basin model. We also offer BLANCO-line composite-stone sinks made from 80 percent granite that, though more expensive, will retain the impression of a kitchen or bathroom hewn from natural materials while coming in a variety of colors and designs. - Source: Internet
- Installation: Proper installation and sealing is crucial to prevent leakage and to make sure the sink is properly supported. (A full sink of dishes gets very heavy. You don’t want the sink pulling apart from the underside of your countertop and crashing to the floor.) - Source: Internet
- I always recommend embedded anchor bolts and metal brackets if countertop is thick enough (generally about 3/4" or more) with the caulk or epoxy between sink and countertop just being counted on for providing the waterproof seal between sink and countertop. Otherwise, mounting treated wood support pieces (typically 2x3 or 2x4) across the underside of the countertop or across the cabinet to screw mounting brackets into, or with some flimsy or very large double or triple sinks to directly support it from the underside, though that can make plumbing a bit more of a hassle but sometimes better than none at all. This type of direct under-support can be especially needed with thin porcelain or the new colored or fused glass sinks and true stone sinks like marble or soapstone, though why anyone would buy a glass sink is beyond me - talk about an invitation to failure when mugs or frying pans or such get dropped into it. - Source: Internet
- You can support an undermount sink with a combination of metal supports, plywood frames, clips, and silicone caulking. Sometimes installers use particle boards to support undermount sinks. This isn’t the best choice, though, because particle boards are vulnerable to moisture. - Source: Internet
- We won’t sugarcoat the truth here. Replacing a drop-in with an undermount sink is difficult, and in most cases, the result is unsightly. Let us explain why. - Source: Internet
- Next is to apply a thin layer of sealant to the sink lip and place the sink in from underneath. Adjust it into position under the granite. Be sure to use clear caulking when working on your granite countertop especially if the stone is dark in color. This will give it a cleaner and more professional appearance once the project is done. - Source: Internet
- In terms of appearance, the undermount sink takes things a notch higher. It comes in a clean, streamlined, modern look that goes well with contemporary kitchen styles. And if you need the effect to be a little stronger, simply pick the same material as your countertop. - Source: Internet
- To make sure the opening in the countertop is perfect for the sink, we need the template that comes with the sink in the box. When you buy an undermount sink from us, we already have the template. Actually, when you buy the sink from us, we have the sink AND the template at our shop which saves you some running around. - Source: Internet
- Undermount sinks, on the other hand, work well with all countertop materials except custom tile and laminate tops. In the case of these two, the underlying MDF or particleboard fails to hold the clip fastener in place, making the installation less durable. Also, both laminate and custom tile tops are extremely vulnerable to water damage. - Source: Internet
- If you have a heavy undermount sink, like ceramic models, install an undermount sink support ($100) to keep gravity from pulling your dishwashing station down. Silicone caulking isn’t going to be enough. Remember, the mount also has to support the weight of the garbage disposal, pipes, and a stack of dirty dishes. - Source: Internet
- Check for cracking or moldy caulking, and replace it if you see an issue. You are supposed to recaulk every three to five years to ensure that your undermount sink will last a long time. If taken care of properly, it’s going to stay there for life and it doesn’t weaken or damage your granite countertop the slightest. Undermount sinks on granite countertops are an asset to a home which is why it is so popular these days. - Source: Internet
- Conversely, installing an undermount sink is a pretty challenging task. It needs to be installed below the countertop, so you need to have a complete understanding of the right techniques, methods, and tools. Not to mention the sink itself is quite heavy, which means you’ll most definitely require a professional hand during installation. - Source: Internet
- Measure the sink opening in your granite countertop. Normally, it will be 33 X 22 inches from outside the rims. Take the measurements with you when you go to your local home improvement center when it’s time for you to select your new sink. - Source: Internet
- First things first, you should start with getting your undermount sink ready for installation. Make sure that your sink is the proper size for your countertop. Don’t forget to get every clip and mounting kit needed to install an undermount sink. - Source: Internet
- Unfortunately, the same cannot be said of undermount sinks. They cost a pretty penny, approximately 50-100% more than their rimmed counterparts. And because they’re a bit daunting to set up, their installation costs are also high. - Source: Internet
- If you already have the countertop installed, you can position the sink in the cabinet below the opening to install it. Have help raising it into position to secure it to the countertop. Use the clamp method to support it until the epoxy dries. - Source: Internet
- Your choice of a reveal style should be based mostly on your visual preference. Most fabricators I know prefer the zero reveal style—arguing that it’s the cleanest. Some experts say that a positive reveal just gives you another narrow, hard-to-clean surface around your sink (and believe me, it’ll get dirty as you become accustomed to sponging messes from the countertop right into your undermount sink). A negative reveal also produces a hard-to-clean surface on the counter underside where dirt, grease and germs are likely to build up unseen. - Source: Internet
- With your slab ready to have the undermount sink anchored to it, you can either go for the DIY route or hire a contractor. While installing an undermount sink to a precut stone slab is certainly doable for someone with minimal experience, the benefit of hiring a contractor is that they have likely done the job dozens to hundreds of times. Precision is key to this project, to ensure no leaks or no surprise incidents in which you find your sink in the bottom of your cabinet. - Source: Internet
- All our countertops at Marble and Granite work with undermount sinks. Ultimately, undermount sinks can be used with any type of stone countertop, whether its marble, granite or quartz. Their installation won’t present any real problems for a professional contractor and you could even handle the job yourself if you’re handy enough. - Source: Internet
- Whether you choose an undermount or drop-in sink may come down to what type of countertops you have. Not all countertops will work with undermount sinks because of the weight and adhesion required. Laminate or tile countertops are not suitable for undermount sinks. - Source: Internet
- Pull the sink up and into place through the drain hole. Have the second person tighten the screws. - Source: Internet
- This next phase depends on whether you want to install the sink with the countertop already in place or if you want to attach the sink to the countertop and then install it all in one shot. Doing the install once the countertop is installed really depends a lot on the size of your under sink cabinets. In many cases you’ll have to drop the sink in before putting the countertop down, and in others you’ll be able to finagle the sink in through one of the cabinet doors. - Source: Internet
- Apply the epoxy around the corners of the sink and then quickly press the metal mount into the epoxy so that it oozes through the holes. Make sure the mounts are positioned correctly so that they lock over the edges of the sink. Once the epoxy dries, your undermount sink is good for use. Now remember, you’re looking at about 24 hours before all the appropriate compounds set completely. Even if the epoxy and silicone look dry, don’t expose them to water until after 24 hours. - Source: Internet
- At the end of the day, there’s no outright winner. It’s all about which one you find more appealing. Just remember to keep your budget in mind when choosing between a drop-in sink and an undermount sink. All the best in your renovation journey! - Source: Internet
- As for the undermount sink, it lacks that rim that sits on top of the counter. Rather, this sink mounts under your countertop and stays in place thanks to extra durable calk, metal clips, or adhesive. You must install these support clips during installation to ensure your sink mounts safely beneath the counter. - Source: Internet
- Step 1: Remove the old sink. You can use a knife to cut around the old silicone. Remove the sink from the countertop by unscrewing the undermount brackets. - Source: Internet
- Once the sink is clamped in place, get underneath and ensure it’s a snug fit. After you’re confident with the placement, lower the sink enough to apply silicone caulk around the rim of the sink. Then crank the sink flush against the countertop, lock the clamps, and let the caulk dry. - Source: Internet
- Remove any clips and lift the sink out of the hole, and set it aside. You might need to scrape any lingering caulking from the underside of the counter. - Source: Internet
- If the quartz countertop is already mounted or glued onto the cabinets, there’s no need to remove it. It is easy to replace an existing sink. Here are both steps: - Source: Internet
- Since you’re not going to cut the sink opening yourself, you’ll need to tell your countertop fabricator which sink and faucet you plan to install, and which reveal style (more on this in a moment) you prefer so he or she can cut the opening to the correct size and shape. Choose a sink that fits into the base cabinet below the counter with some room to spare. Your fabricator will work from a sink template, usually available from the manufacturer. - Source: Internet
- An undermount sink should be attached to the countertop before it’s installed on the base cabinets. It’s awkward to do it otherwise—there’s typically not enough space inside the sink base cabinet to do what you need to do. If for some reason you need to install the sink with the top in place—or reset an existing undermount sink that has separated from the underside of the counter— you’re probably going to have to cut the cabinet sides to gain access to clip fittings that secure the sink against the underside of the counter. Installing the faucet will be a pain, too. - Source: Internet
 To begin started, here are some tips for finding information about How to Install an Undermount Sink:
- Research undermount sink with granite?-related information from credible sources. This includes libraries, websites, and even journalistic professionals.
- When researching Best Adhesive For Undermount Sink To Quartz, it is vital to be aware of the numerous sorts of electronic media sources, such as Google and YouTube. Social media platforms, such as Facebook and Twitter, are also likely to contain information regarding Undermount Sink Adhesive.
To begin started, here are some tips for finding information about How to Install an Undermount Sink:
- Research undermount sink with granite?-related information from credible sources. This includes libraries, websites, and even journalistic professionals.
- When researching Best Adhesive For Undermount Sink To Quartz, it is vital to be aware of the numerous sorts of electronic media sources, such as Google and YouTube. Social media platforms, such as Facebook and Twitter, are also likely to contain information regarding Undermount Sink Adhesive.Video | How To Attach An Undermount Sink
To obtain the most accurate information about Undermount Sink Clips, it is essential to investigate the credibility of each source by reading.
This article contains multiple Install Undermount Sink Without Clips-related films from a variety of sources, which will expand your understanding about Best Undermount Sink For Quartz Countertop. Internet is an excellent resource for getting information on a range of subjects.
## Here are some crucial points concerning undermount sink with granite?:- How To Attach An Undermount Sink
- How To Attach An Undermount Sink To Quartz
- How To Attach An Undermount Sink To A Quartz Countertop
- How To Attach An Undermount Sink To Granite
- How To Attach An Undermount Sink On A Stone Countertop

With so many websites and forums giving Undermount Sink Installation Tips and Tricks-related information, it is not difficult to locate what you require.
This is a highly unconventional method for obtaining knowledge about Undermount Sink Installation Tool, compared to what most people are accustomed to. It permits a more in-depth examination of the content and application of information regarding how to attach an undermount sink to granite.
 Methods for creating aesthetically pleasing and informative displays of How to Install Undermount Kitchen Sinks information. They can be utilized in business and marketing environments to convey messages regarding How To Install Drop-In Sink On Quartz Countertop. Consequently, we additionally supply photographs regarding Choosing Kitchen Countertops for Undermount Sinks.
This article concludes by providing an overview of Undermount Sink Clips For Granite. In addition, Undermount Sink Brackets and How to Install an Undermount Sink are discussed to compare your understanding of Who Do I Hire When I Need My Undermount Sink Repaired?.
